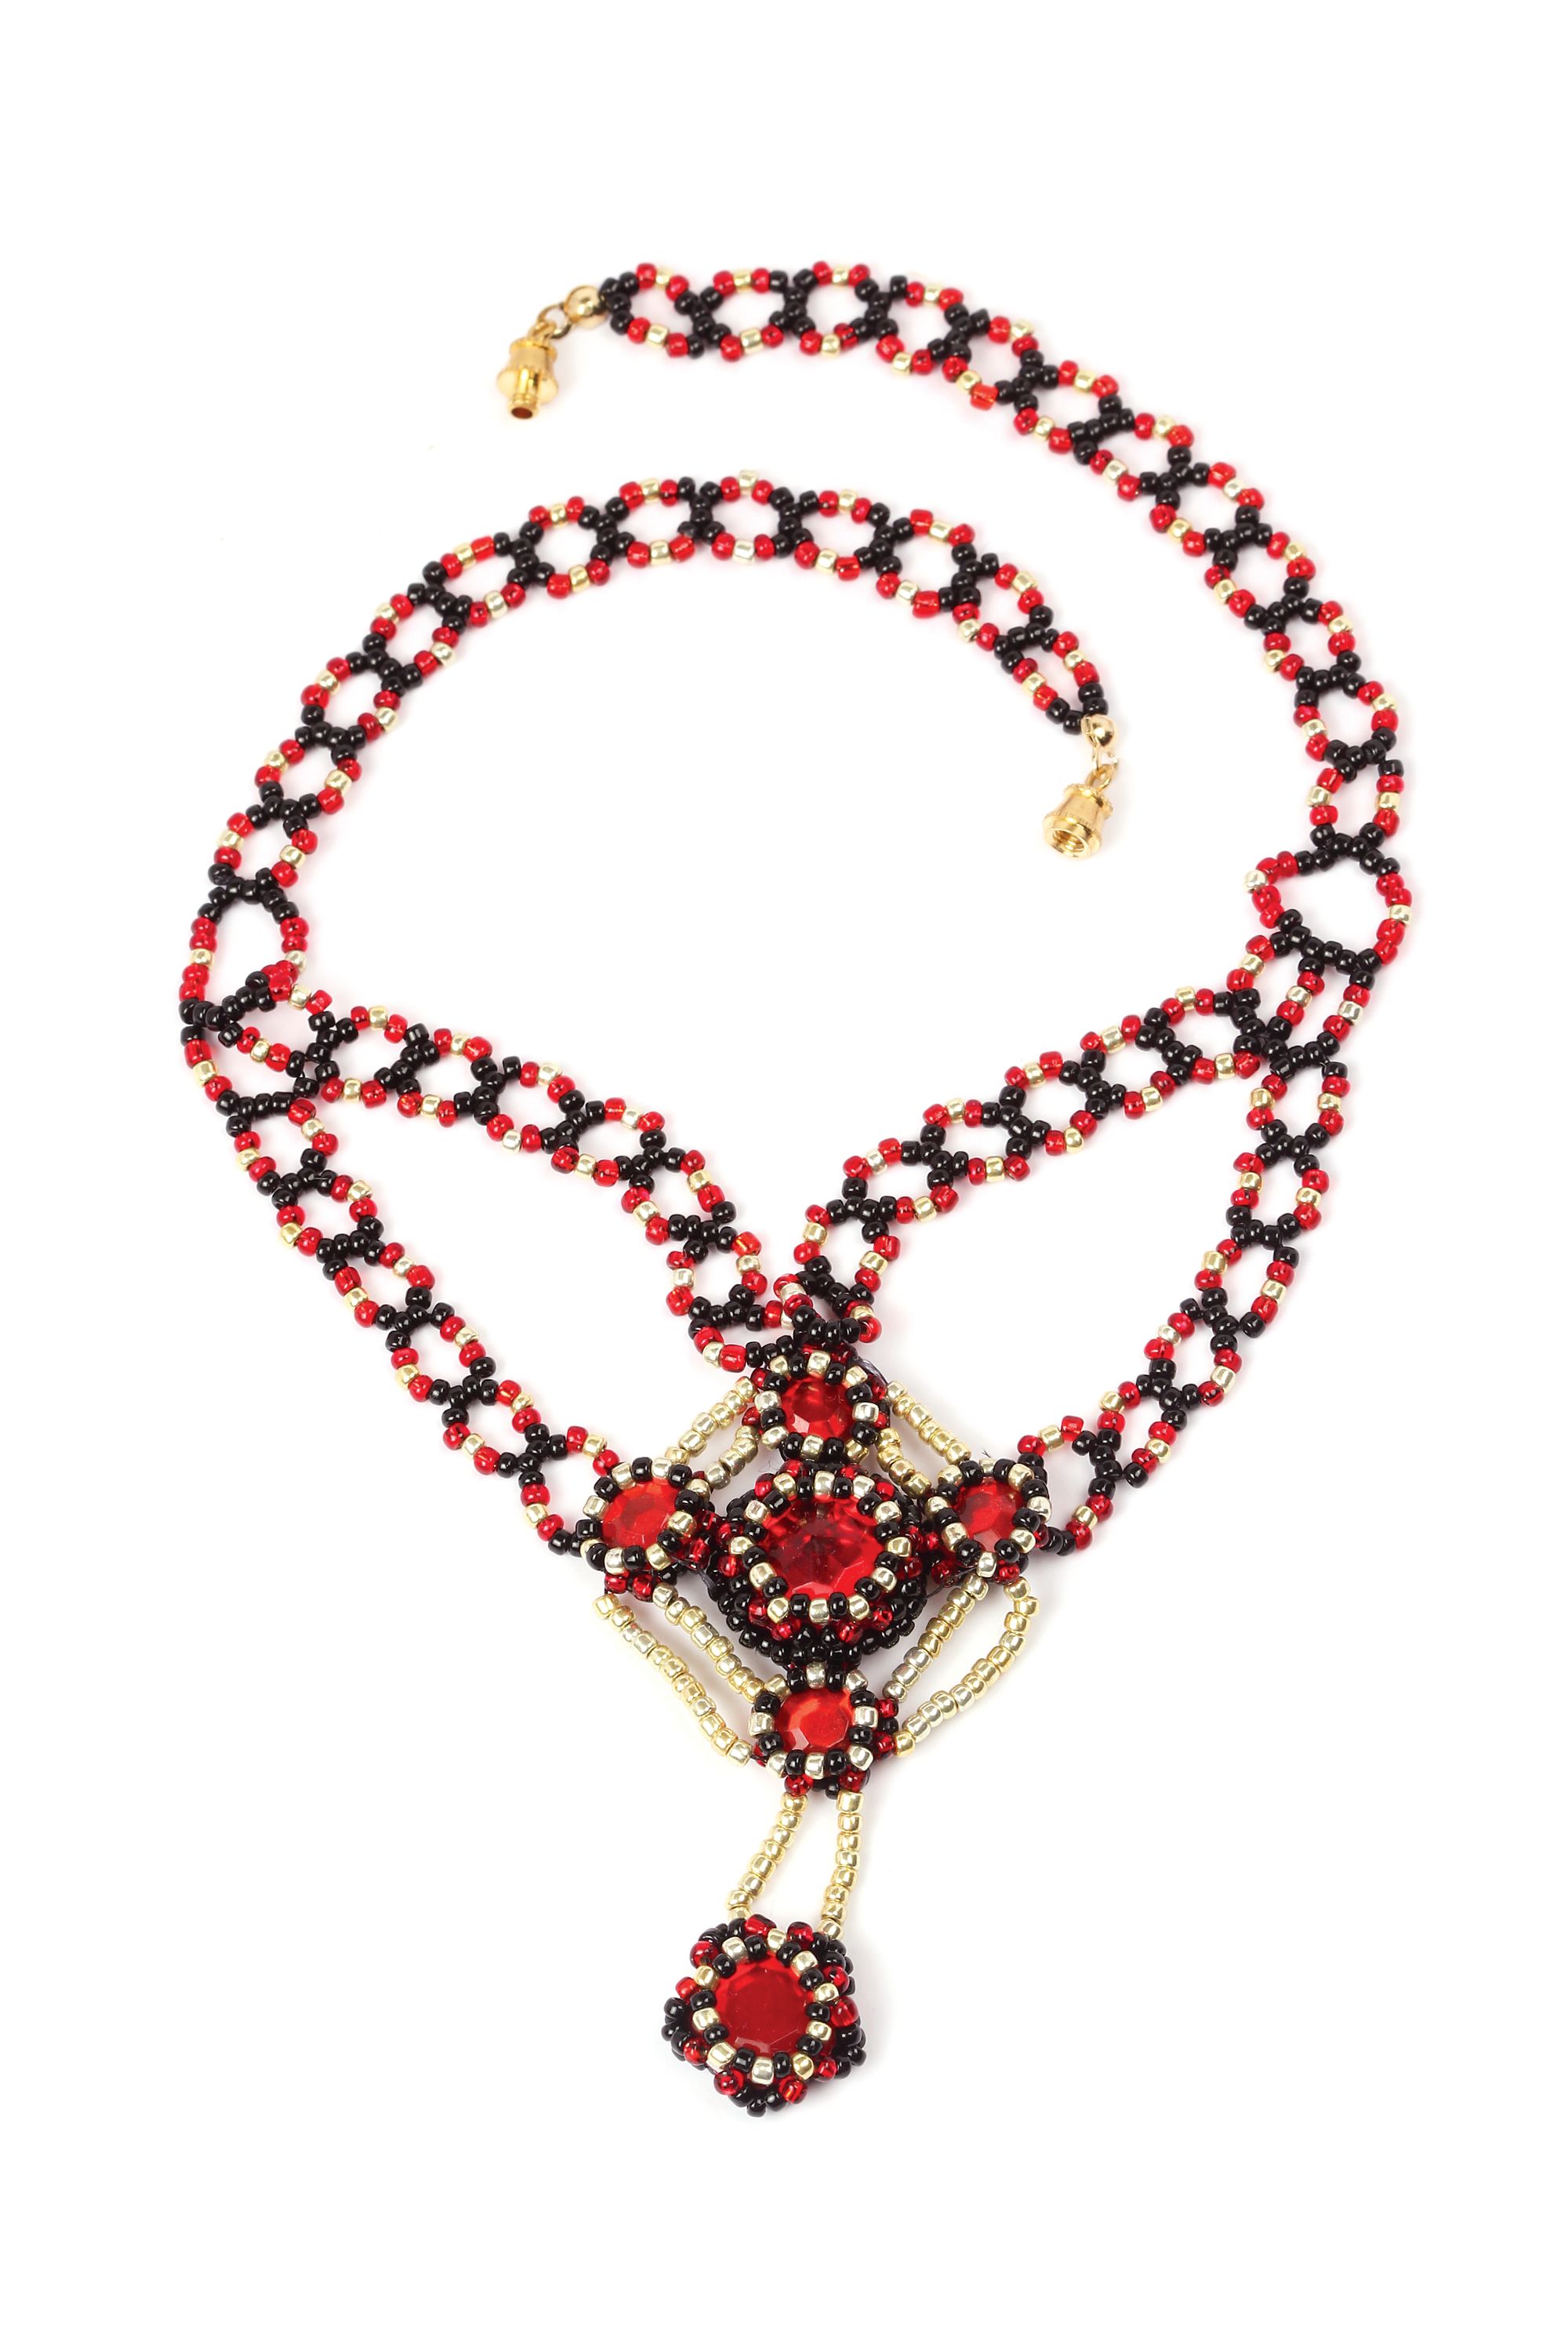
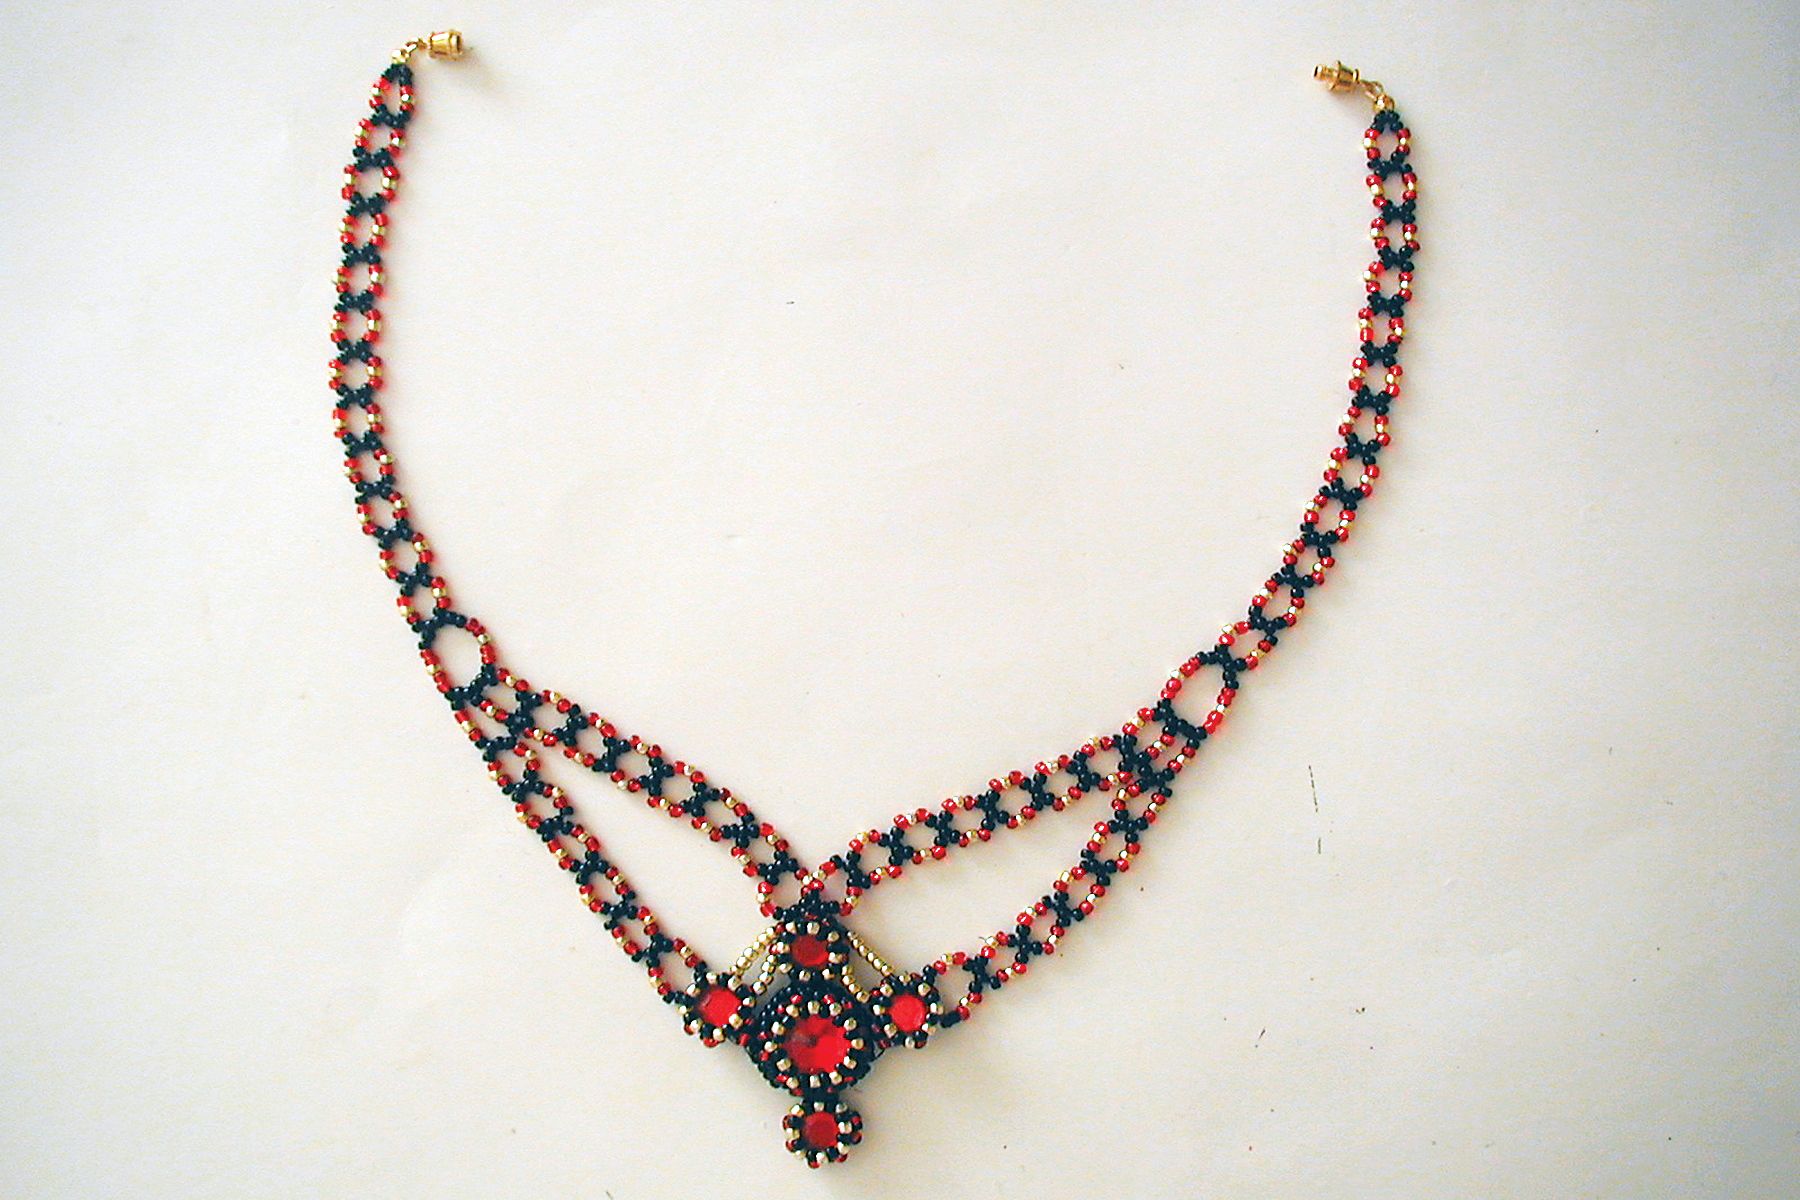
A follow on from our story entitled Designing to Match where Rachel Hyde describes how she creates a piece of jewellery to match a favourite outift. This is the "How to" for the stunning necklace she designed.
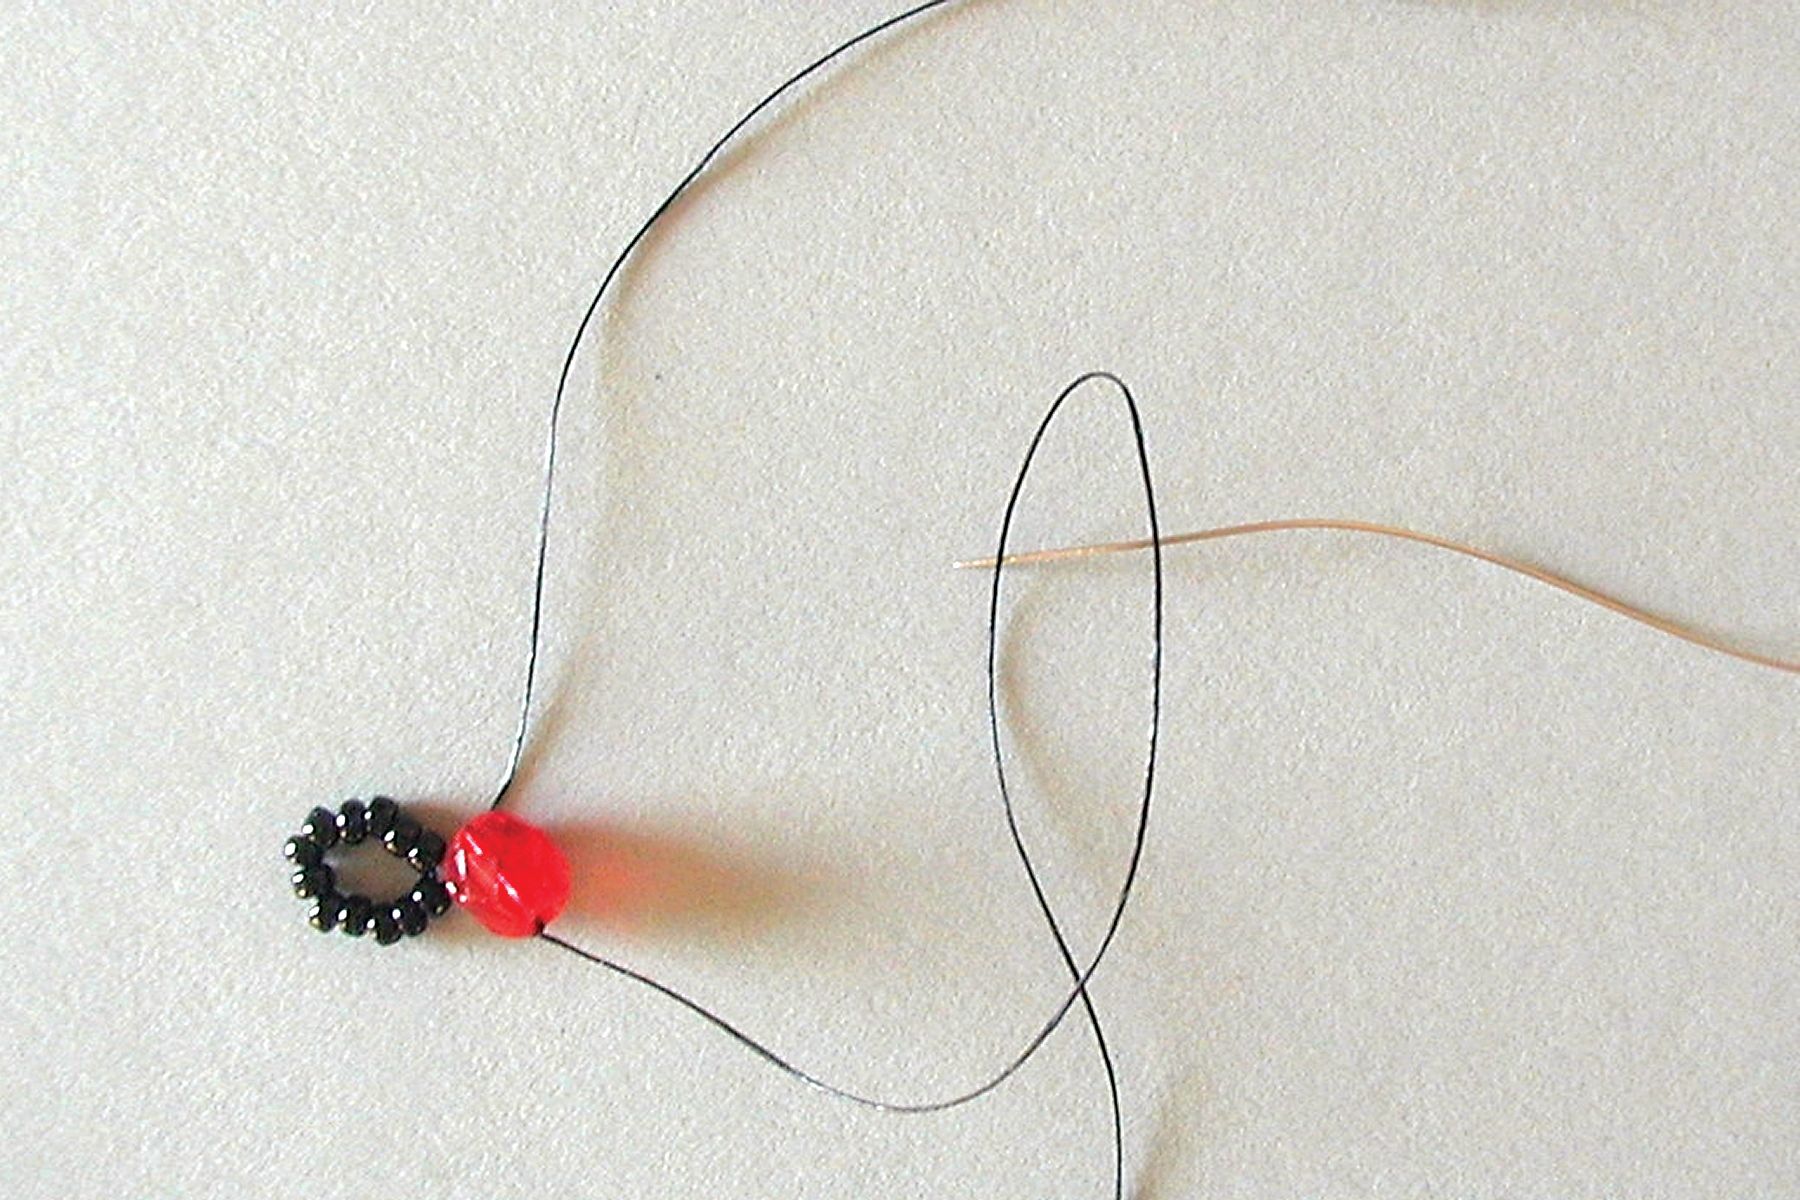
Step 1: Cut a length of Nymo about 1.5m long and condition with Thread Heaven or beeswax. Tie a stop bead on one end leaving a tail about 10cm long and thread on 12(A). Pass the needle through all the beads a second time and tie the threads together, removing the stop bead. See figure 1.
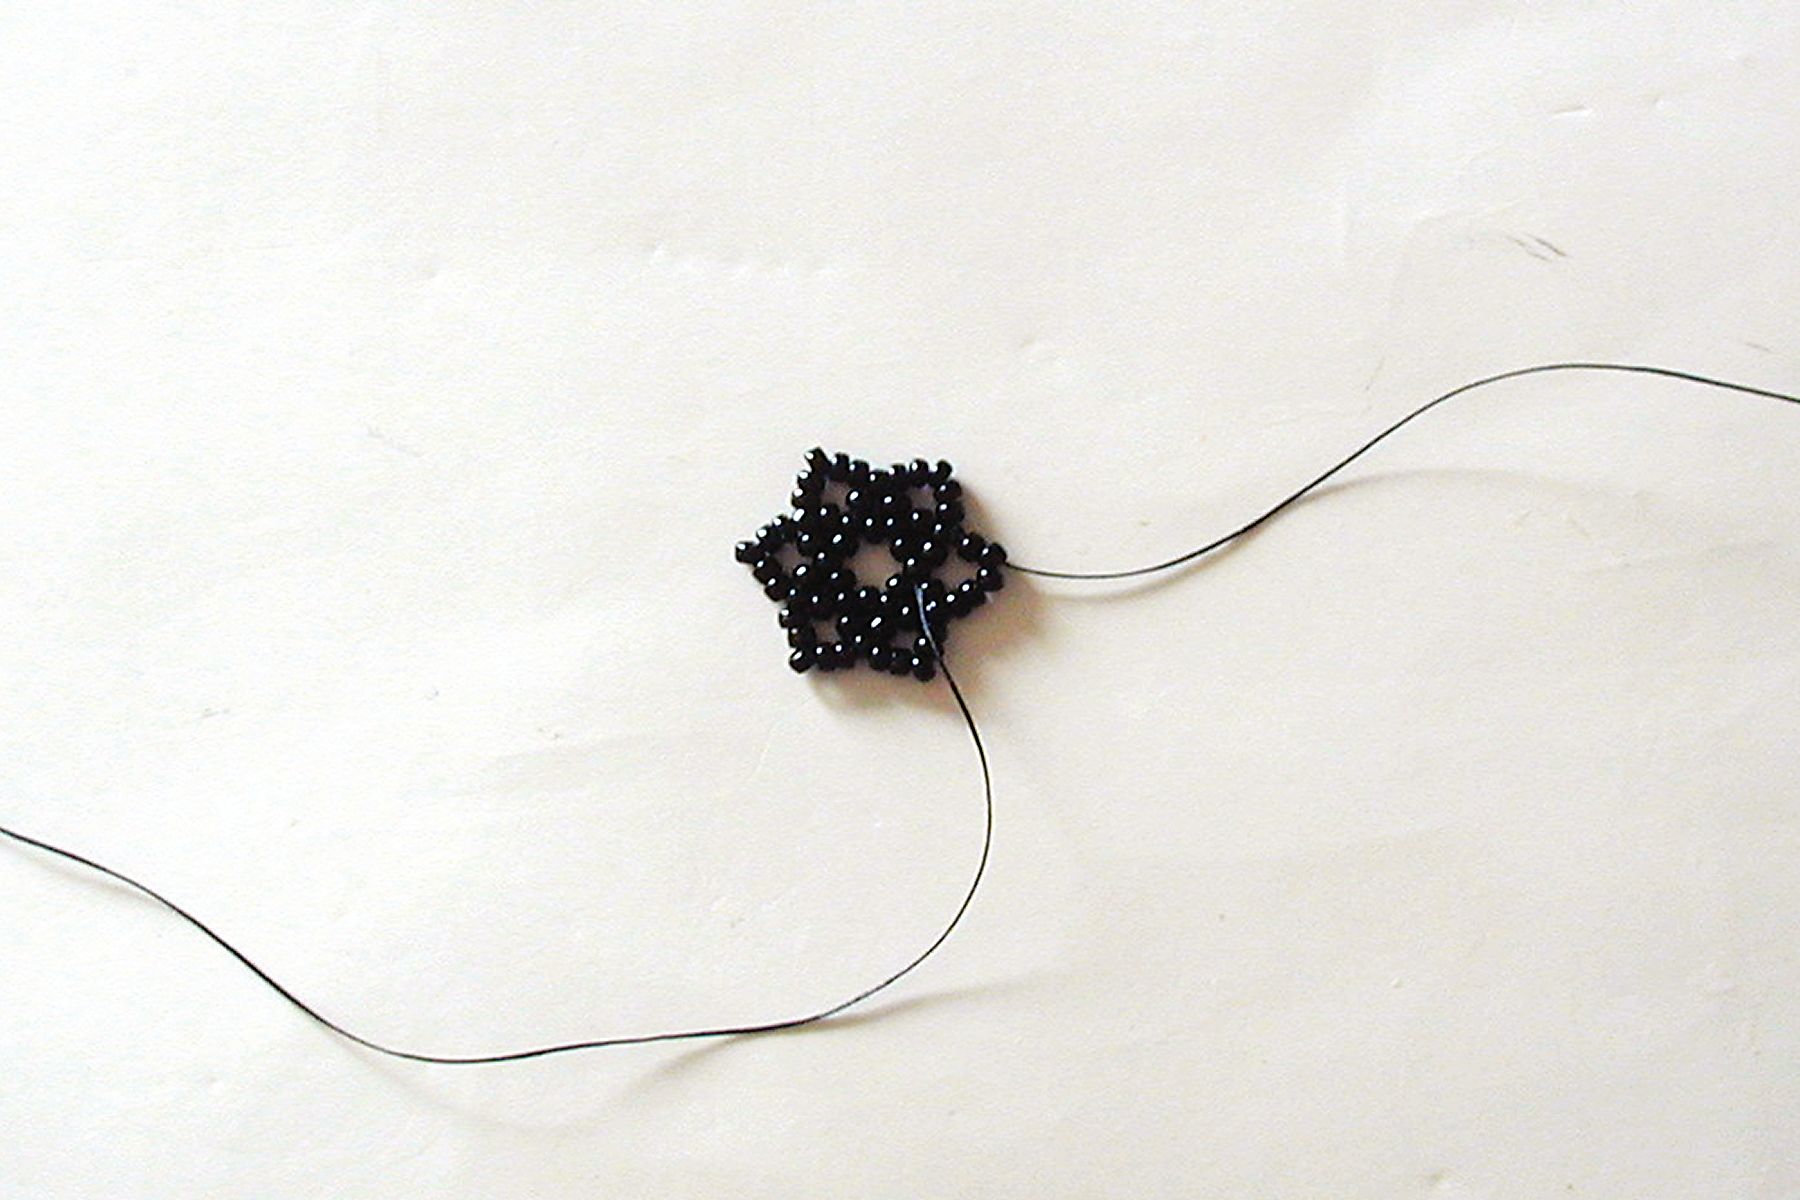
Step 2: Come out of the next bead along and pick up 3(A). Skip a bead and pass through the bead after so that the 3(A) are sitting on top of the next bead you skipped. Continue this all around the ring, adding eighteen new beads in total.
Step 3: Pass up through the first loop until you are exiting from the central bead of this first loop. *Pick up 5(A) and pass through the central bead of the next loop along. Repeat from * all the way around the circle, so you will be adding thirty new beads in total. At the end of the round bring the needle up through the first three beads of the first loop of five. See figure 2
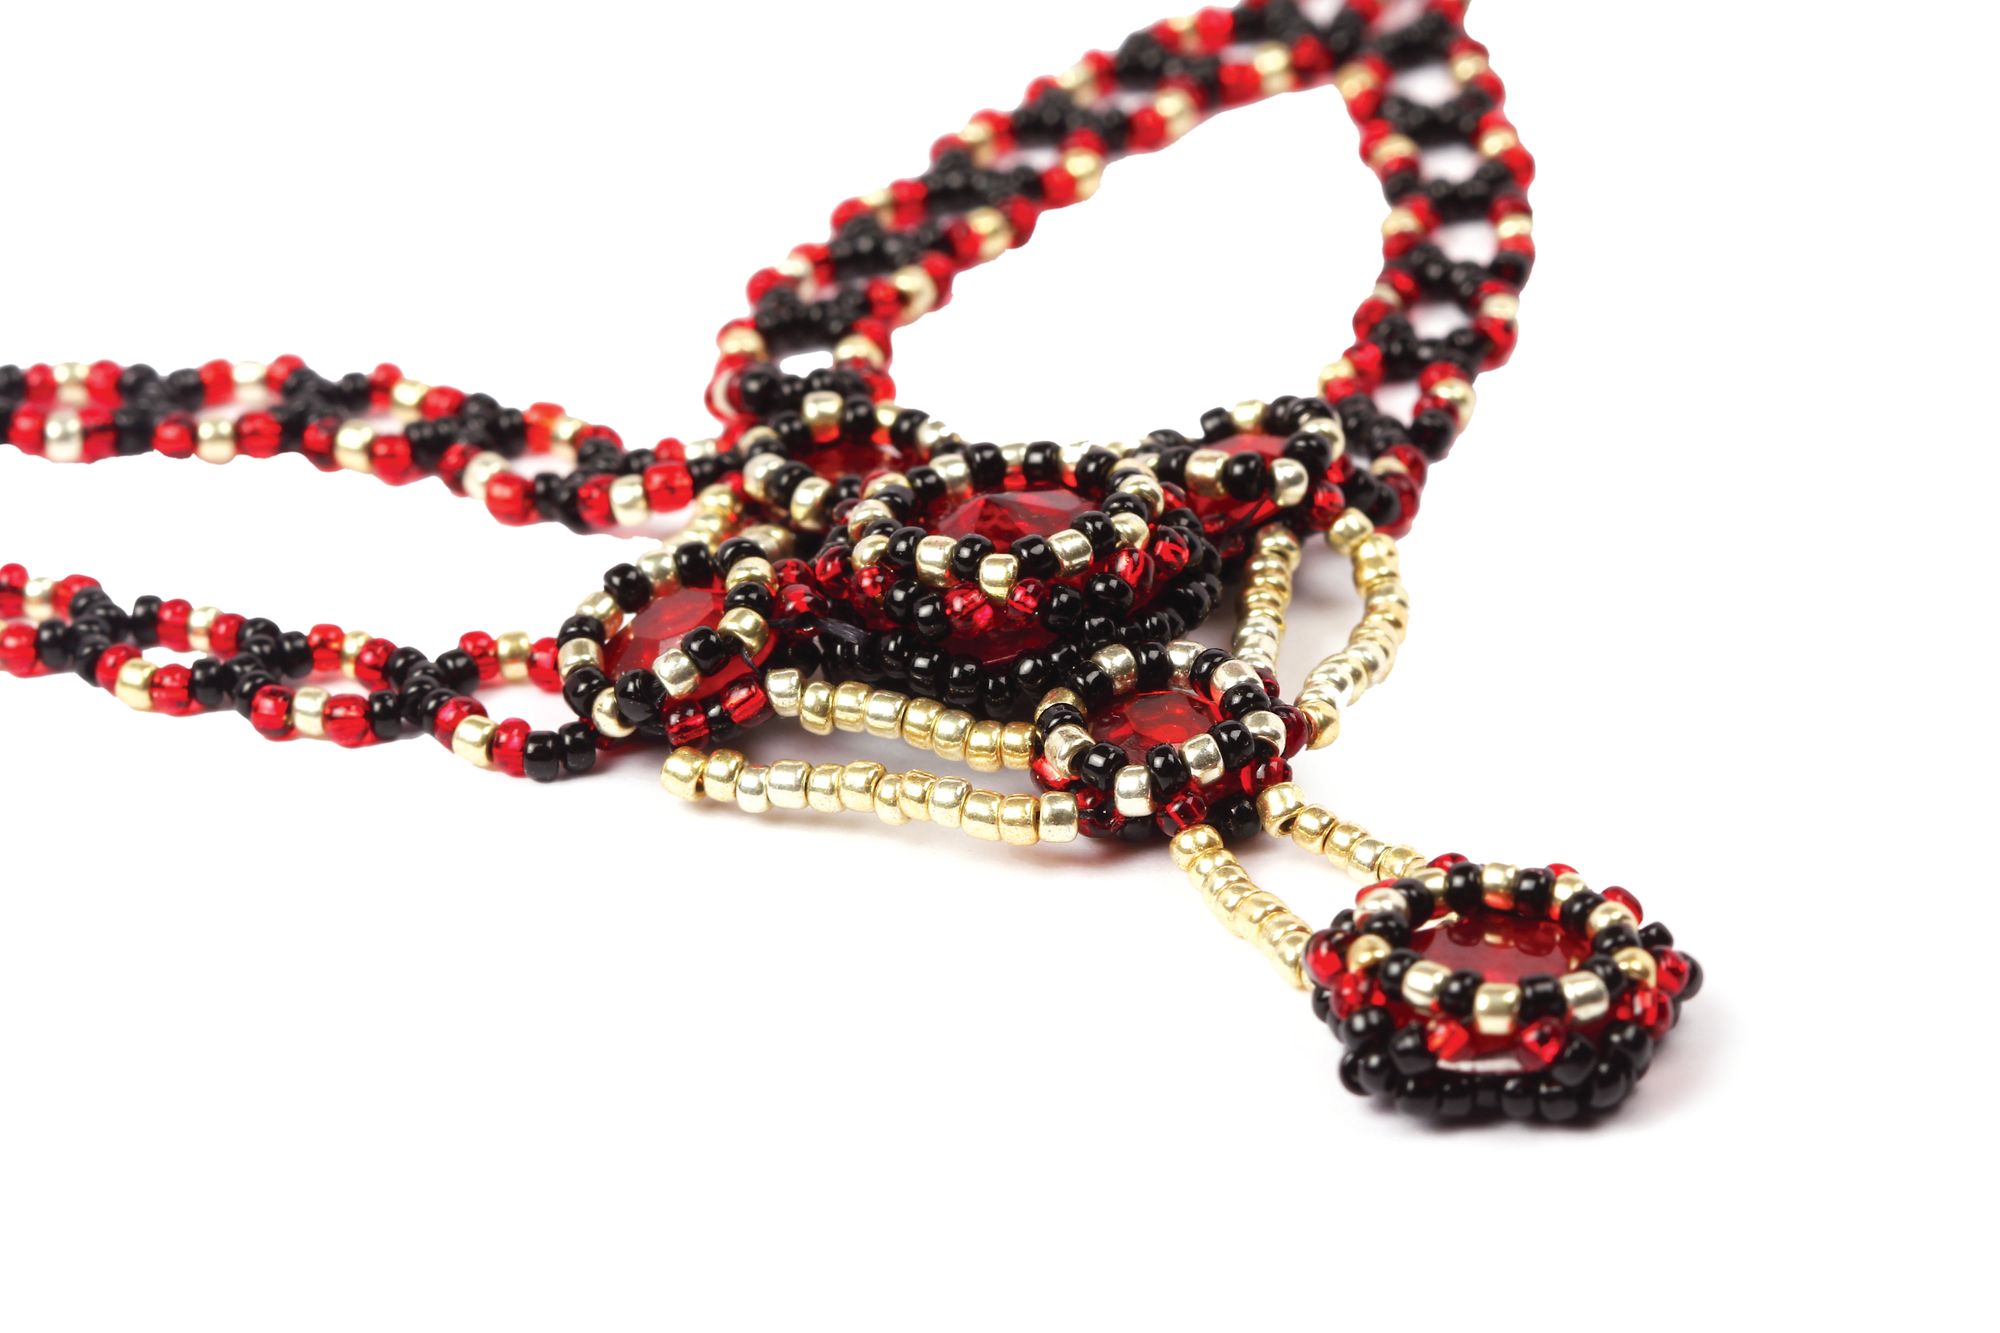
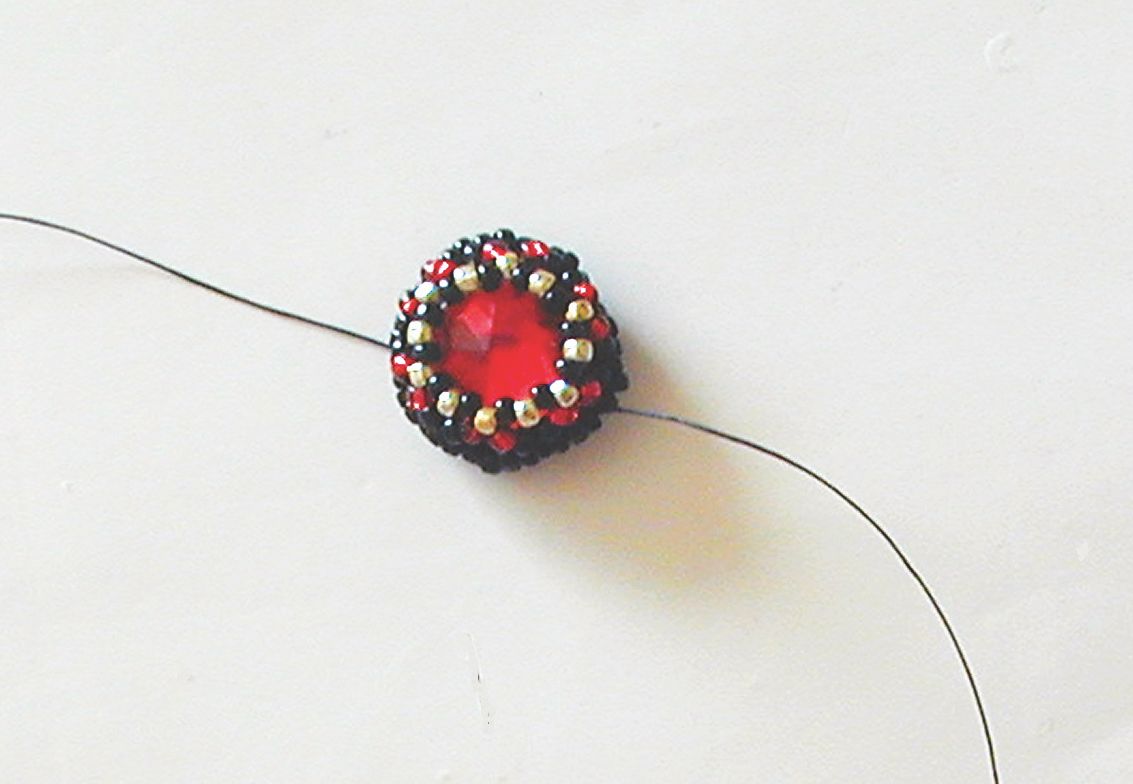
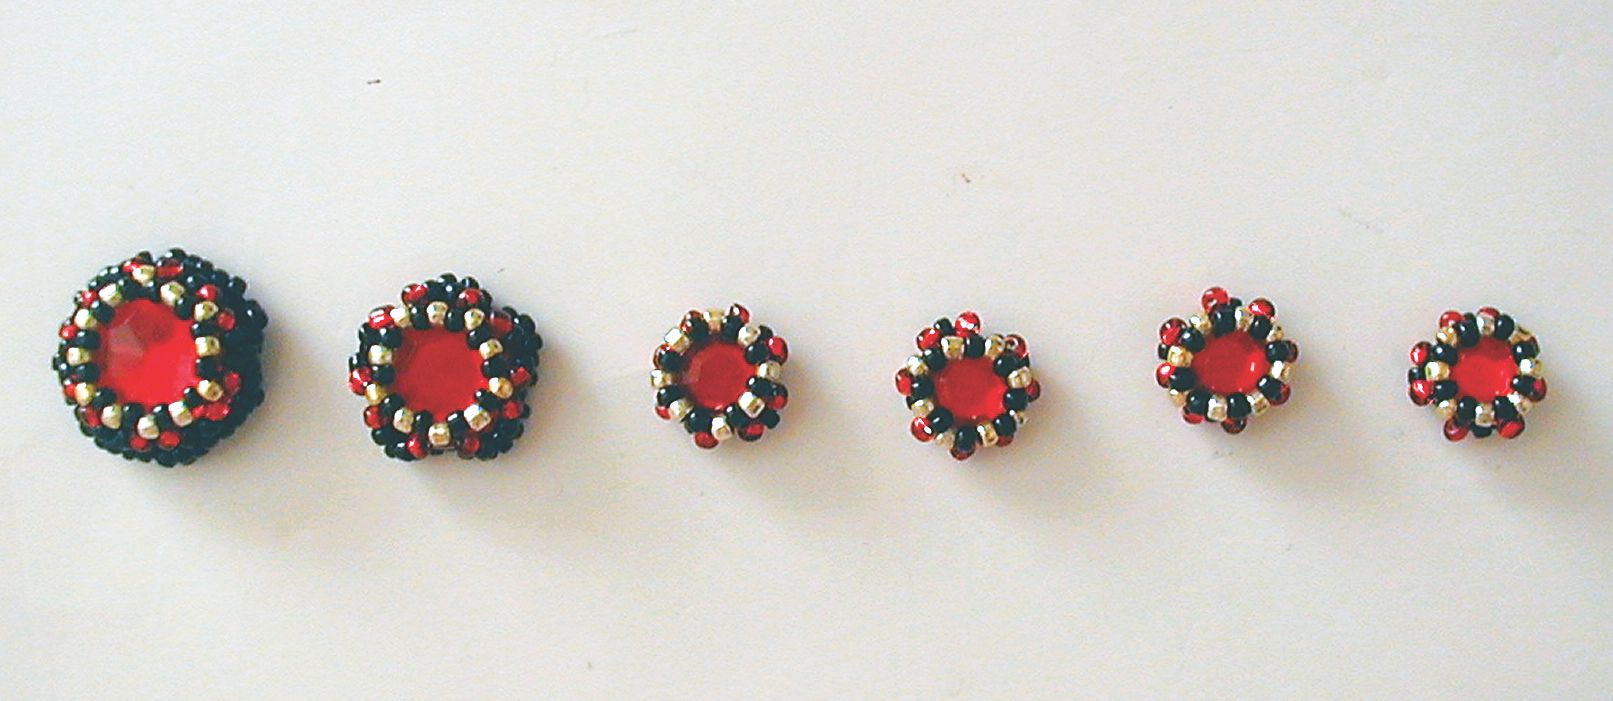
Step 4: Stitch a fourth round, again adding 5(A) in each stitch, just as in step 3. The fifth round has this new sequence 1(A), 1(B), 1(C), 1(B), 1(A), but the thread path is identical to rounds three and four. Sit the 15mm rhinestone in the centre and pull the threads. The sixth and final round has 1(A), 1(C), 1(A) in each stitch (you will still pass through the middle bead in each loop from the previous round). At the end of the round, pull the threads tighter, then go around again to strengthen the work. Weave the thread down to the tail and tie the two threads together. Work both threads back through the beads and trim. This is your central motif. See figure 3.
Step 5: Make a smaller motif using an 8mm rhinestone and starting with 8(A) (follow Step 1). The netting technique is identical, but the bead count for each round is different and there are just four rounds, as follows: Round 2: 3(A) in each stitch Round 3: 1(B), 1(C), 1(B) in each stitch
Round 4: 1(A), 1(C), 1(A) in each stitch
Finish off in the same way and make another three identical motifs. See figure
4.
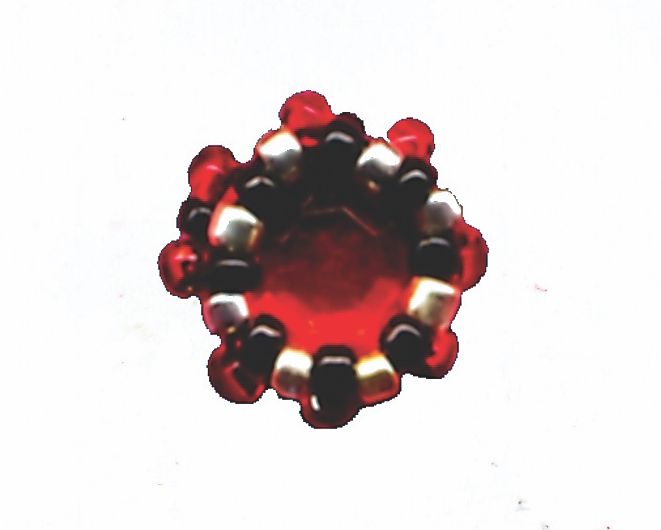
Step 6: Finally, make the dangling motif using the 12mm rhinestone. Round 1: 10(A) in a circle Round 2: 3(A) in each stitch Round 3: 5(A) in each stitch
Round 4: 1(A), 1(B), 1(C), 1(B), 1(A) in each stitch
Round 5: 1(A), 1(C), 1(A) in each stitch
Finish off in the same way. You now have six motifs in three sizes. See figure 5.
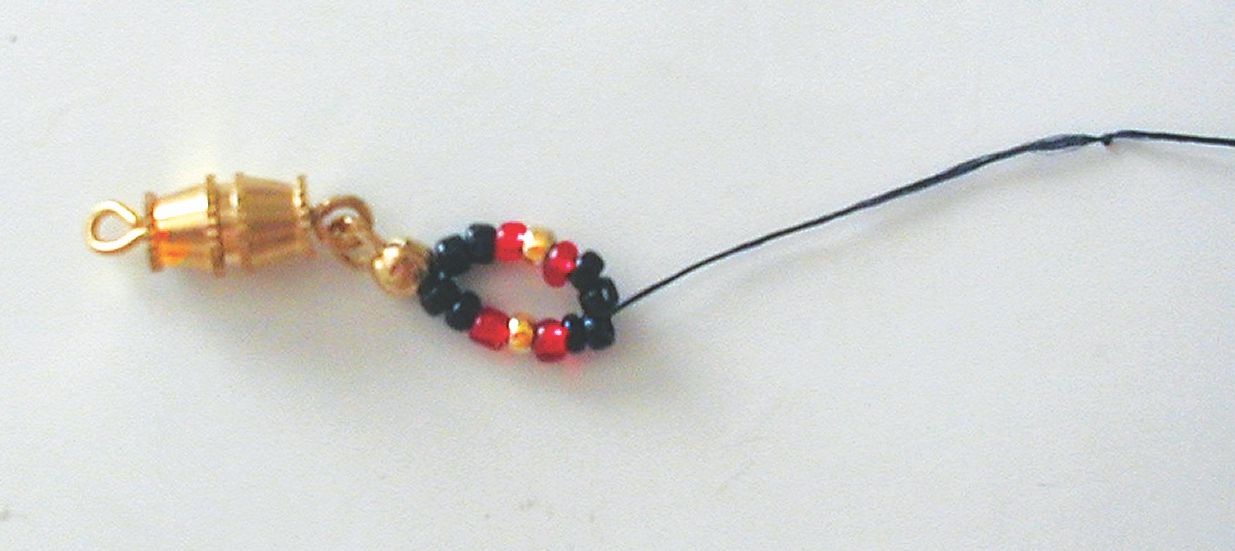
Step 7: The main necklace: Cut a length of black Nymo about 1.5m and condition with Thread Heaven or beeswax. Tie knots in one end about 10cm from the end and enclose the knots in a calotte crimp. Make the knot larger and stronger with clear nail varnish if you wish, but allow to dry before you begin beading. Attach the ring on the crimp to the clasp. String on 2(A), 1(B), 1(C), 1(B), 4(A), 1(B), 1(C), 1(B), 2(A) and make into a ring by going back through the first eight beads added, so you should be exiting from the third black bead in the set of four. See figure 6.
Step 8: *Pick up 1(A), 1(B), 1(C), 1(B), 4(A), 1(B), 1(C), 1(B), 1(A) and pass through the second bead in the group of 4(A) from your first string. Pass on through the beads you have just added until you are exiting from the third bead in the group of 4(A)*. Repeat from * to * another ten times until you have twelve of these rings. and then string on 2(A), 2(B), 1(C), 2(B), 6(A), 2(B), 1(C), 2(B), 2(A) and make them into a ring as you have done for the previous rings. Pass on through this ring until you are emerging from the second of the set of six black beads. See figure 7.
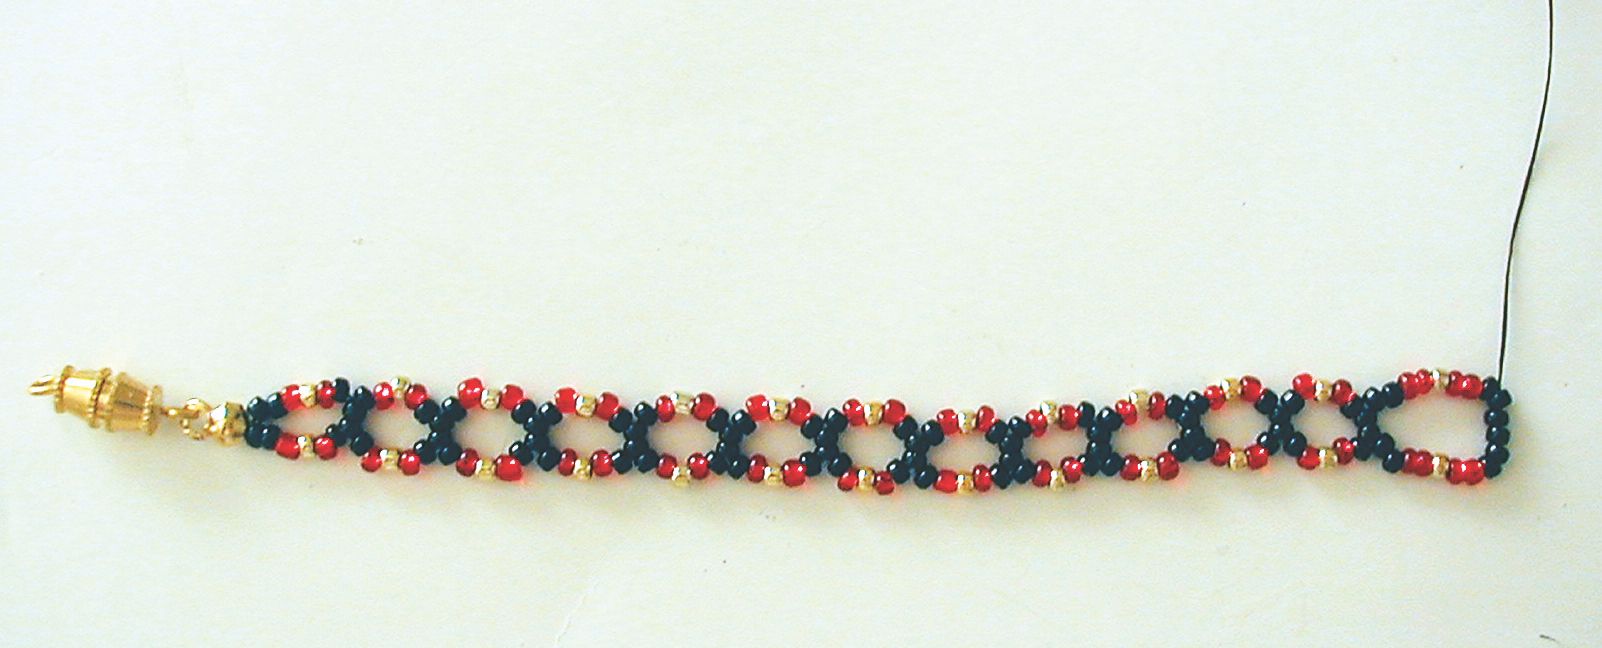
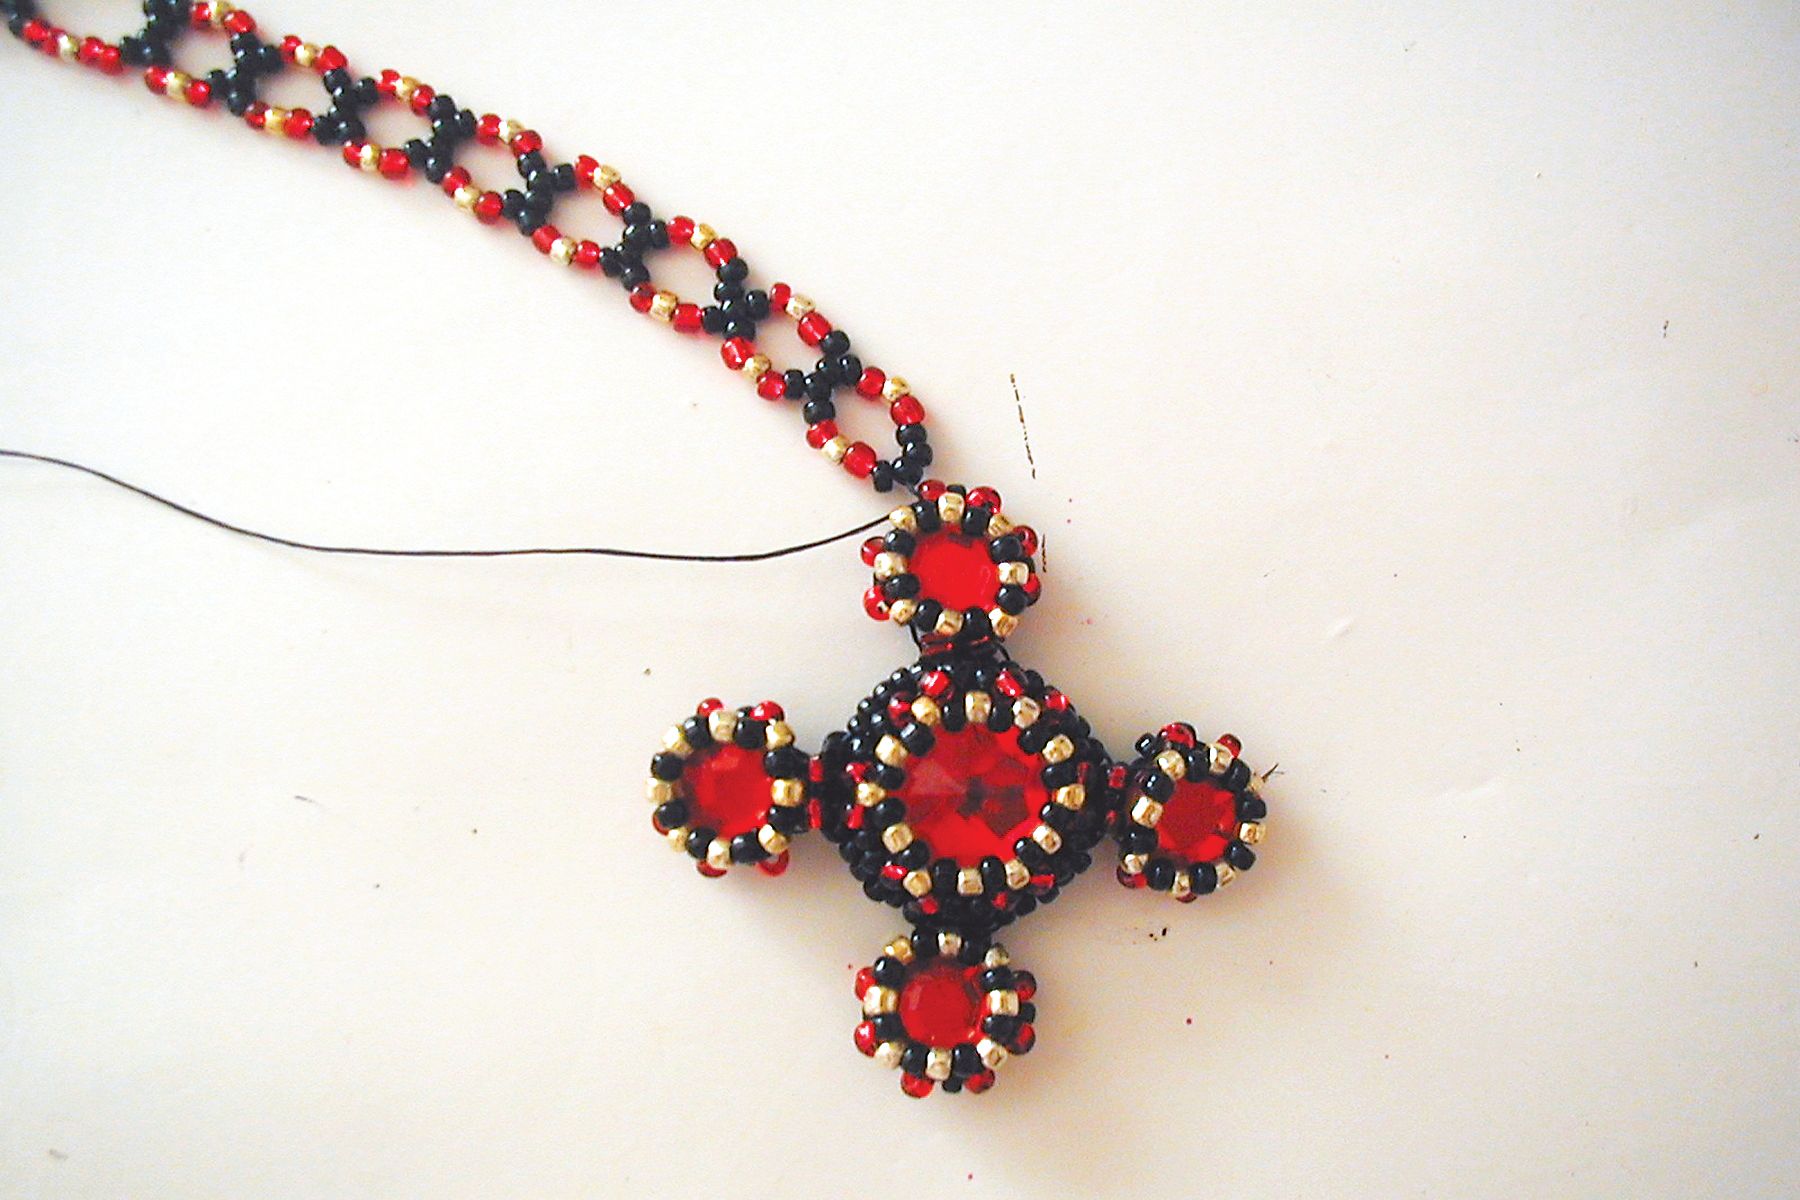
Step 9: Repeat step 8 from * to * to add 8 small rings. Come out in the usual place (third black bead in set of four) and you are ready to add your first small motif. Thread through a 1(B), 1(A), 1(B) sequence of beads on a small motif. This is a combination of beads from the third and fourth rounds and there are four sets of them. Pass back through the middle 2(A) on your final ring, then back into the beads on the small motif and through the next two sets on this small motif. You are now ready to add the large motif. Pass the needle through 5(A) on the large motif; these are in the fourth row you added. Go back through the same beads on the small motif, then the five on the large motif to attach it. Work around to a set of five beads at a right angle to the small motif. Use the same technique to attach a second small motif to the large motif and work another quarter of the way around the large motif, ready to attach your third small motif. See figure 8.
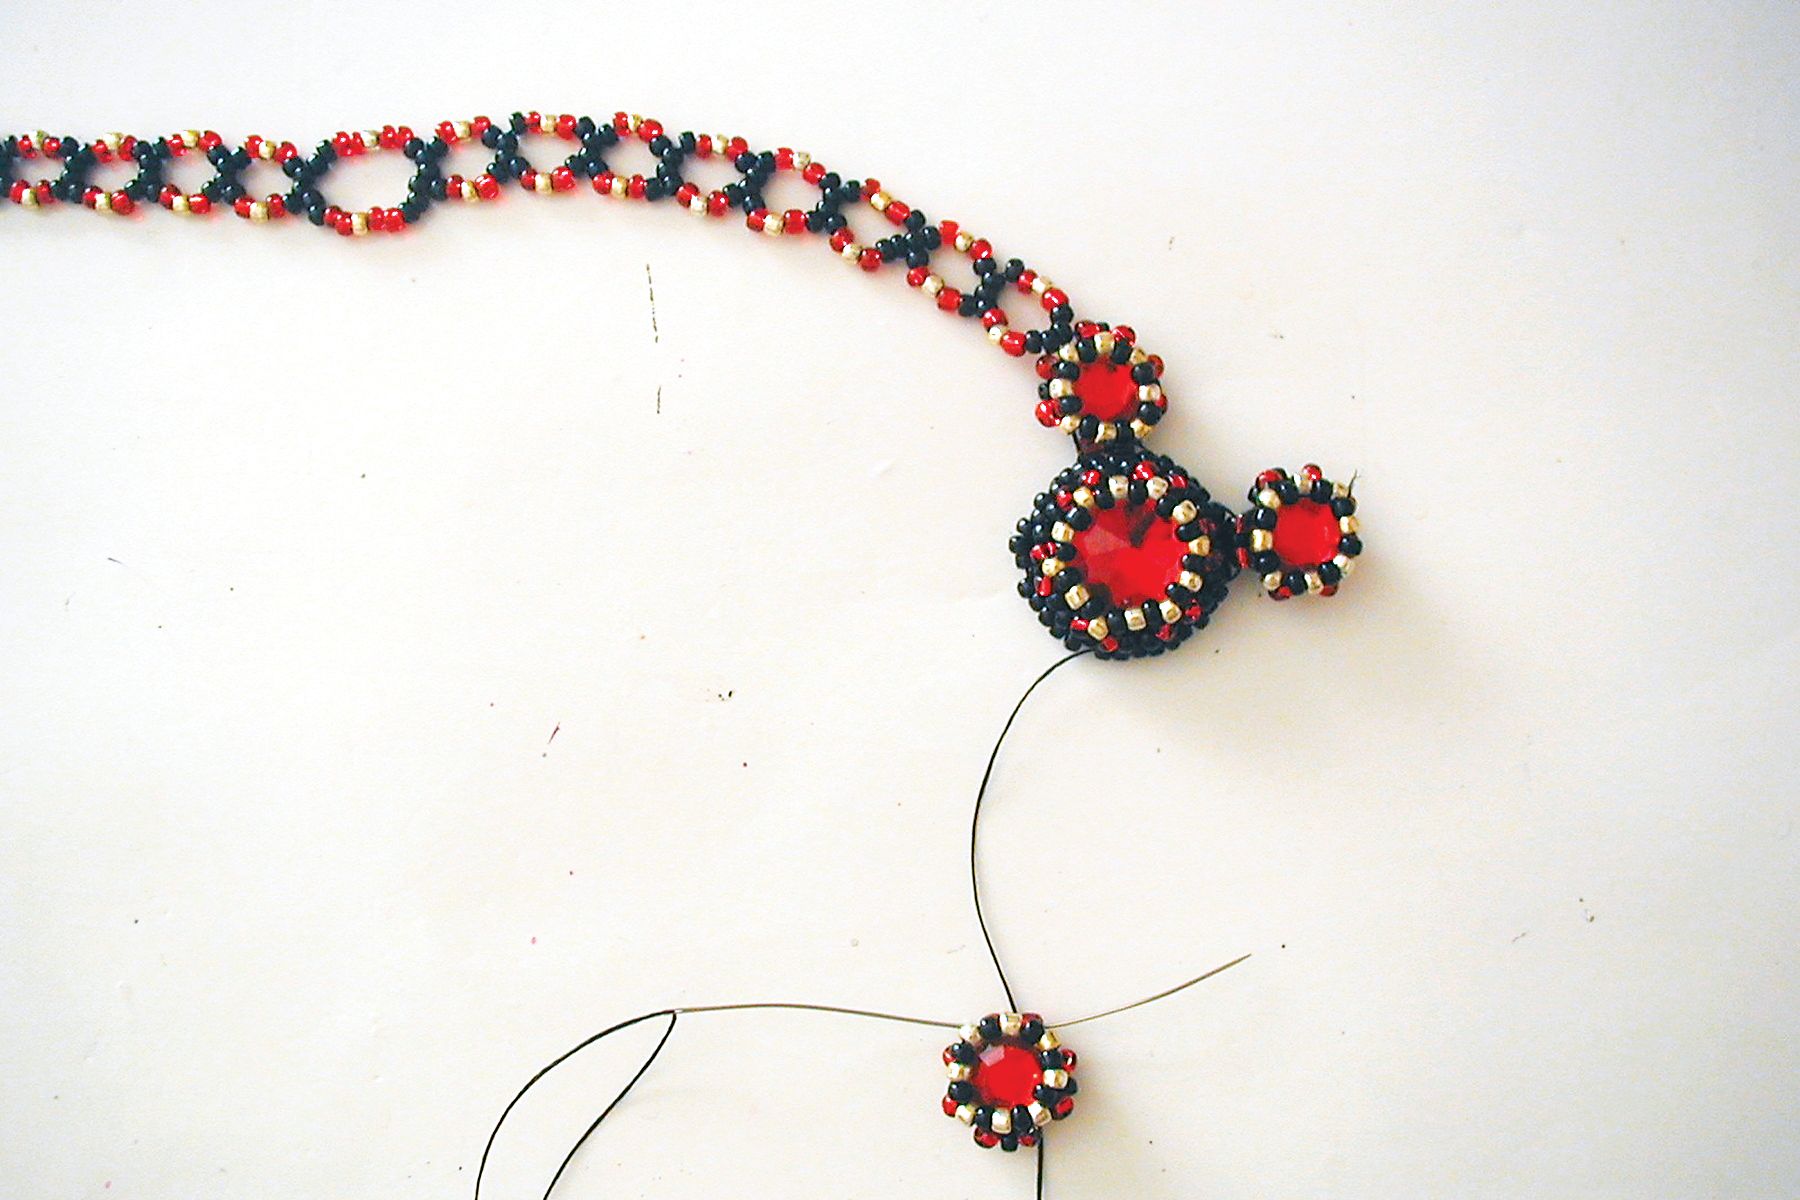
Step 10: Repeat this with all the small motifs until you have made a cross shape and work the thread back up so you come out of the first red bead on the top small motif. See figure 9.
Step 11: Thread on 6(C), pass the needle through the top red left hand bead on the small motif below, then through the black and red beads next to it. Add 4(C), then go up through the next red bead on the top motif, and pass down the edge of the motif, back into the first red bead. See figure 10.
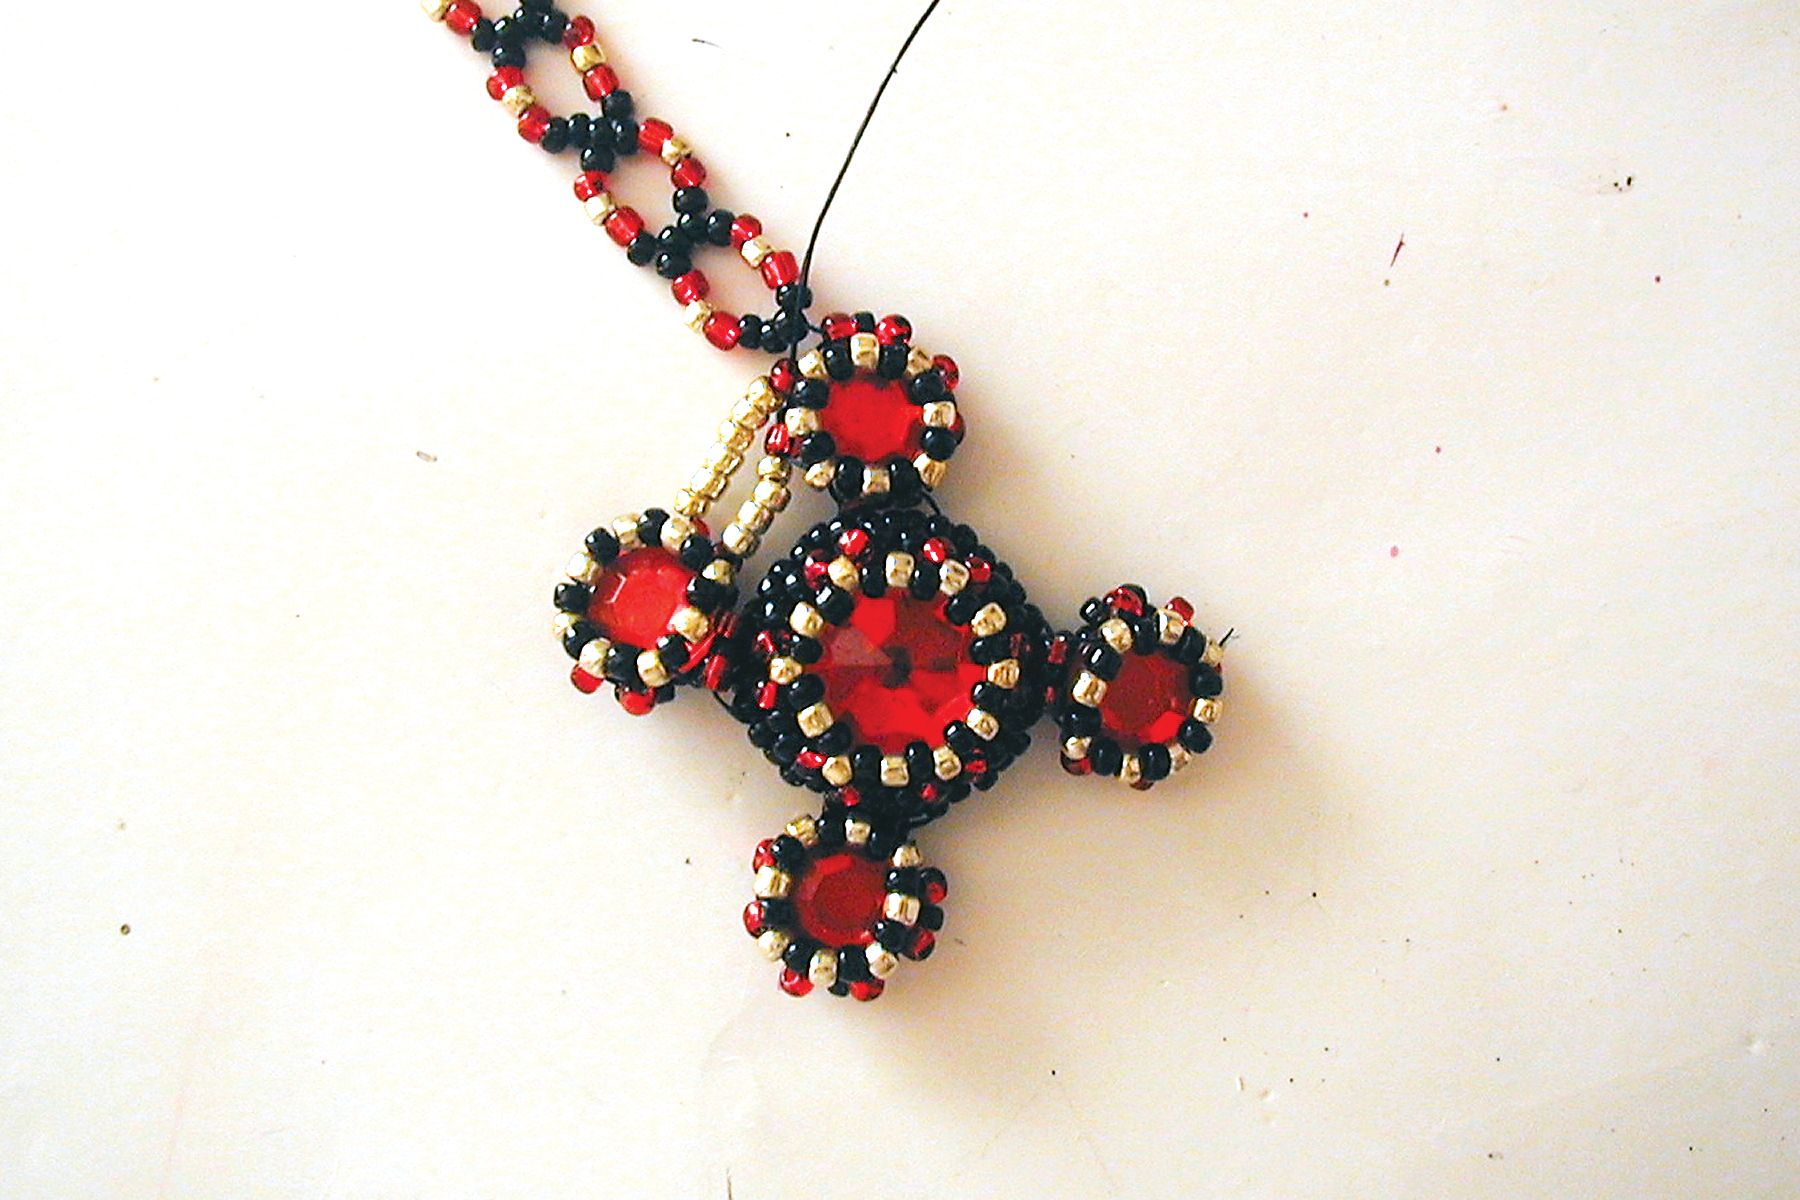
Step 12: Weave around the edge of the first motif and repeat step 11 on the other side. Work back around the first motif and thread back going down the strand of 6(A) on the left motif. Pass up around the edge of the left motif until you are exiting from the top set of three. Pick up 2(A), 1(B), 1(C), 1(B), 4(A), 1(B), 1(C), 1(B), 2(A) and go through this motif’s set of “1(B), 1(A), 1(B)” beads. Go through the ring again and come out third black bead along in the set of four. See figure 11.
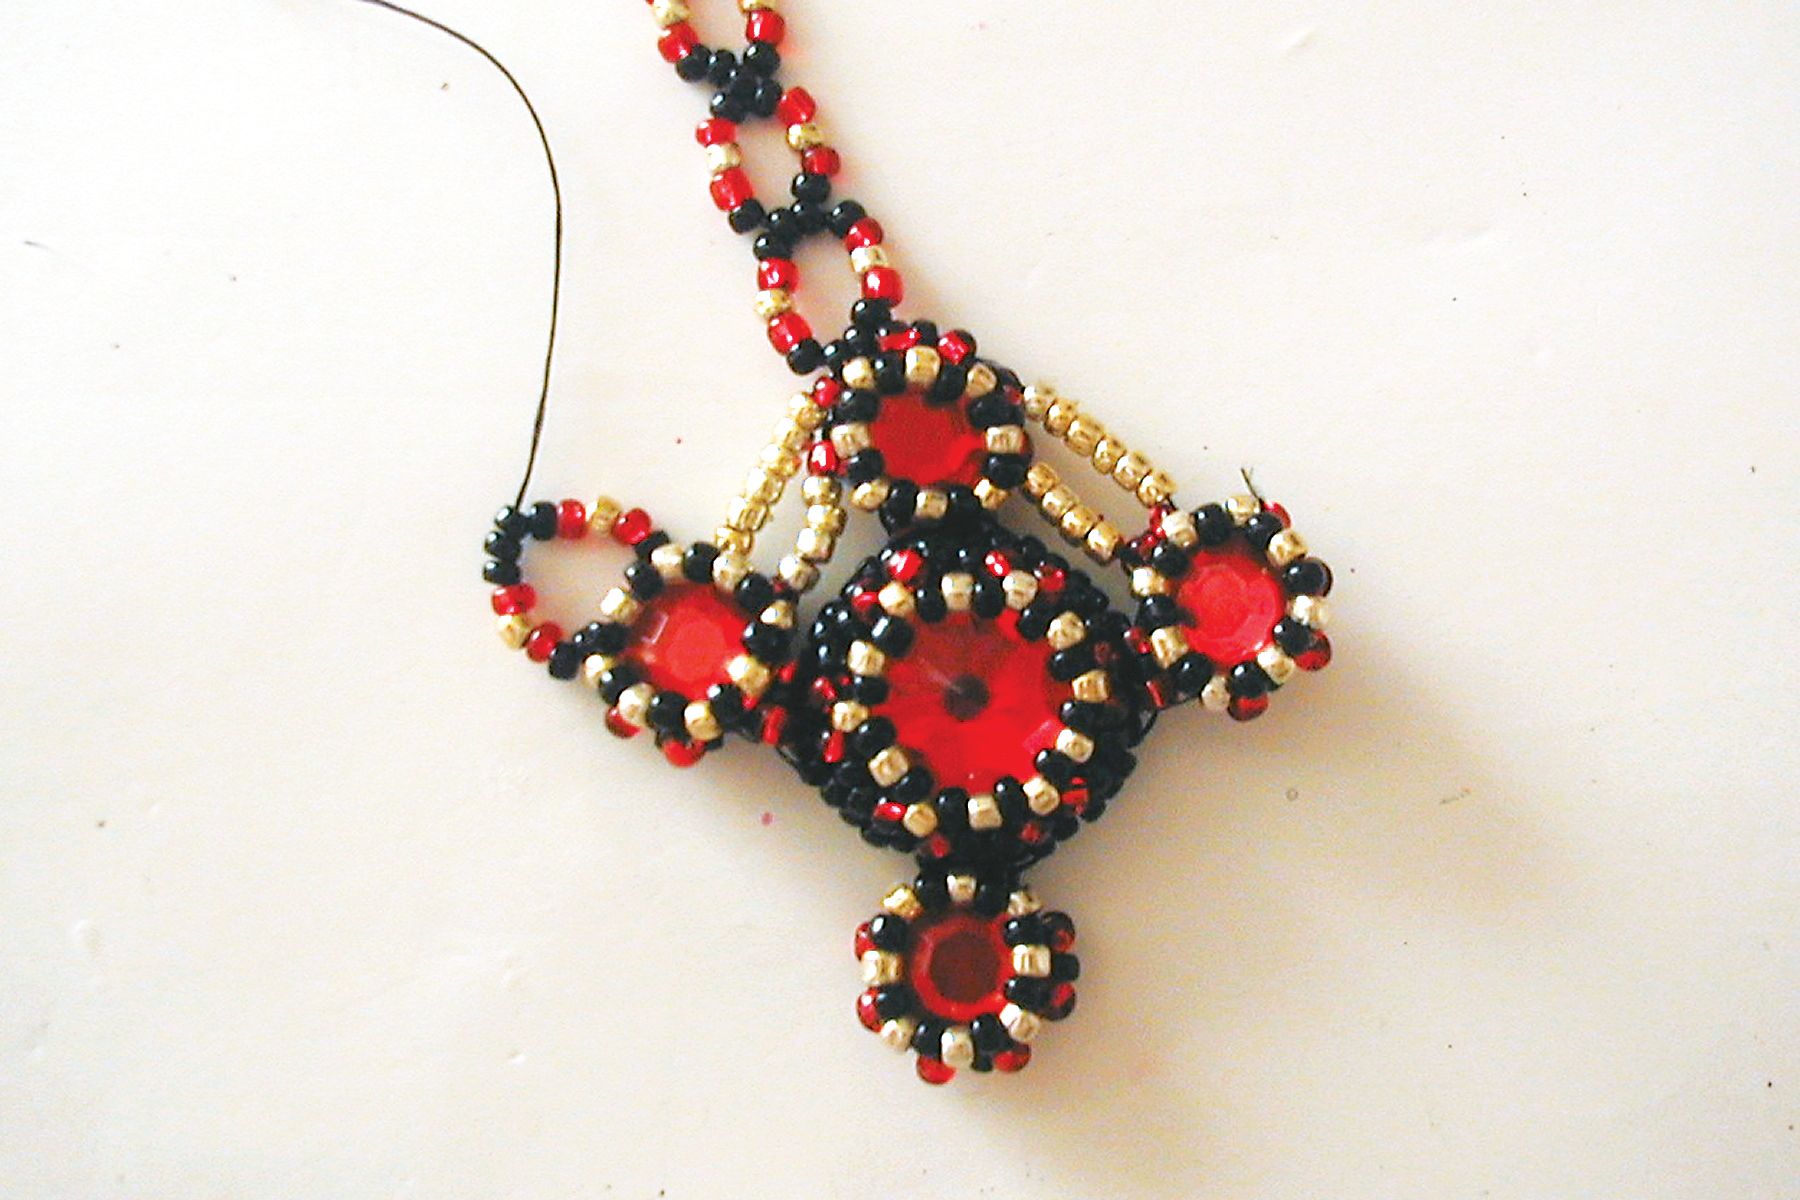
Step 13: Add on another five rings (follow step 8 from * to *). You are going to make one last ring which joins on to the large ring, going through the two black beads next to the small ring from your original set of rings. This final ring is made slightly differently as it has to join to the top small ring from strand 1 as well, so pick up 2(A), 1(B), 1(C),
1(B), 1(A) and go through the two black beads on the large ring. Now go down through 1(A), 1(B), 1(C), 1(B), 1(A) on the top small ring and add one black bead before joining the ring to the one below (fifth ring on strand 2). Finish off the thread and cut. See figure 12.
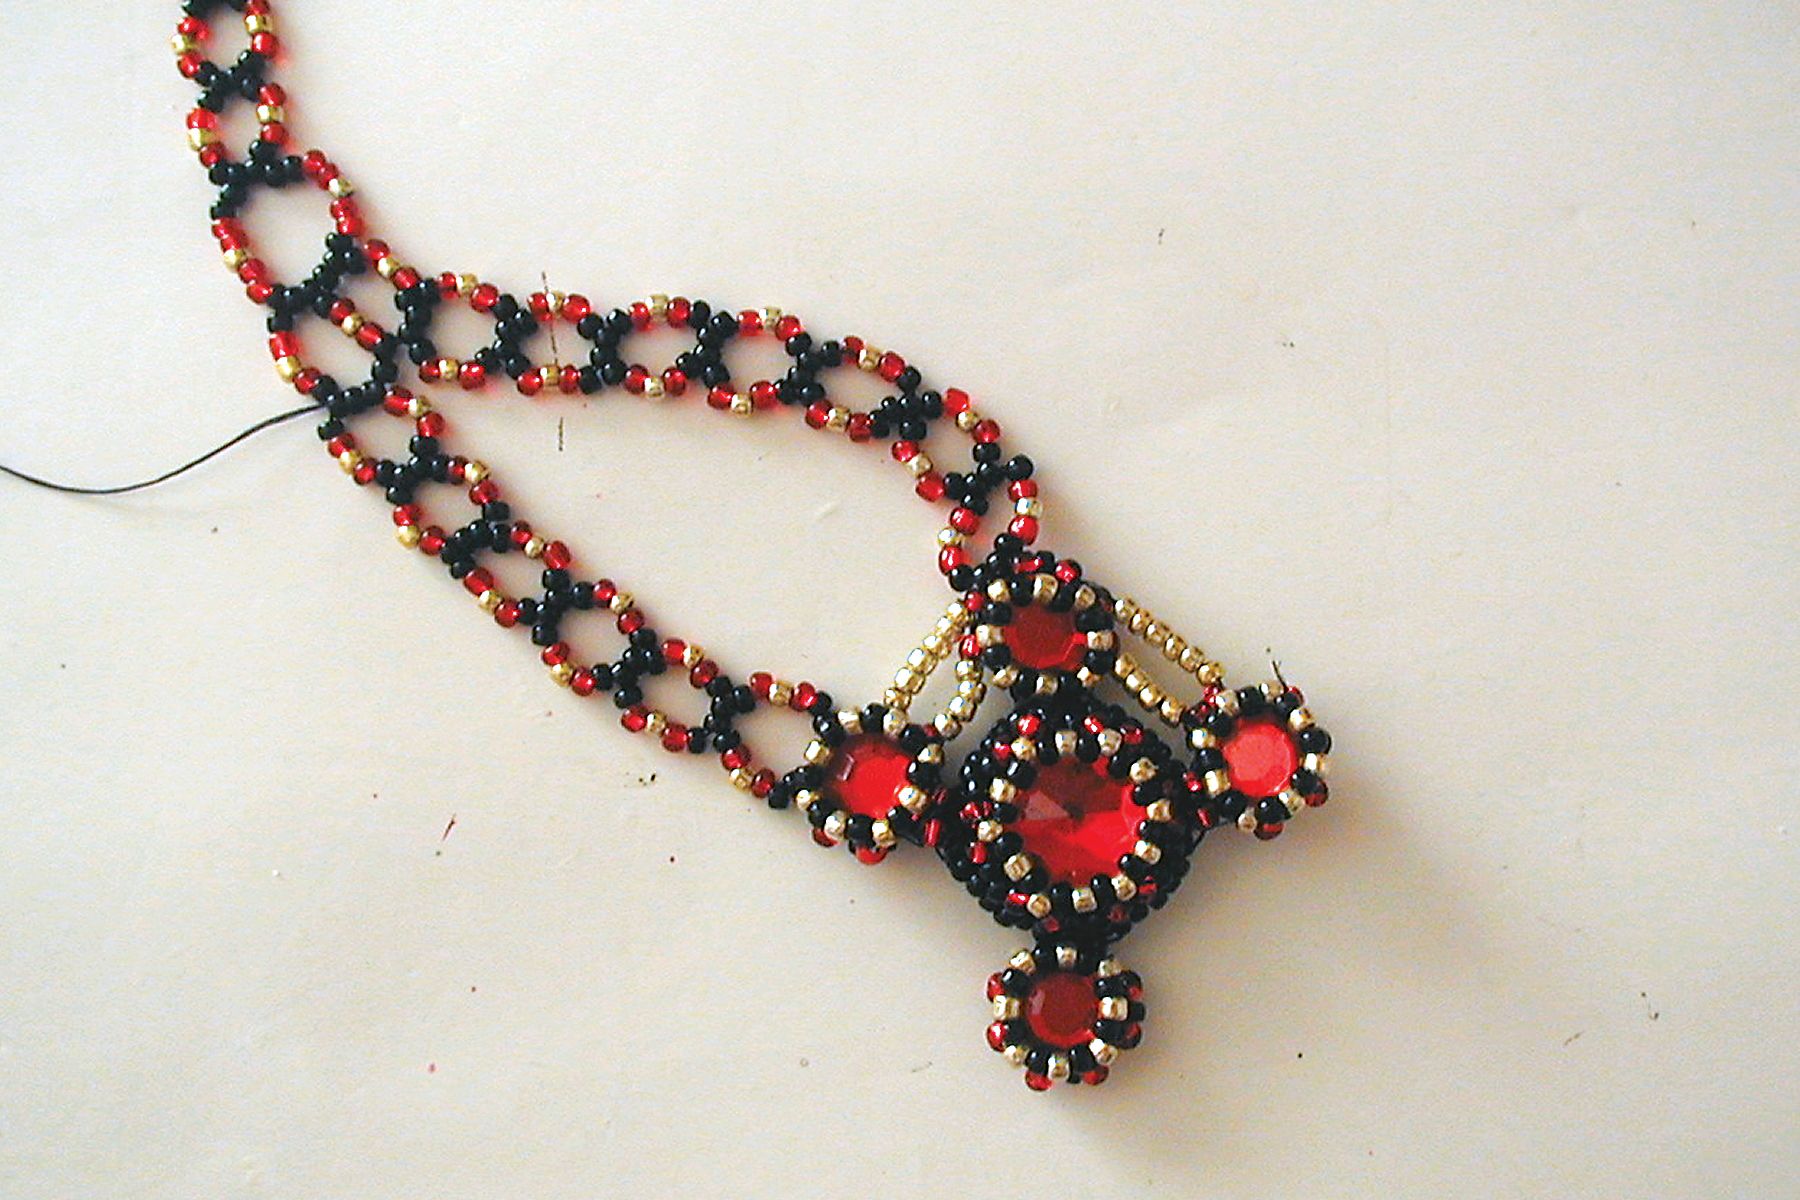
Step 14: Undo clasp and attach another 1.5m length of conditioned thread to a calotte crimp in the same way as in Step 7. Repeat from step 7 to make another chain just like the one you have already made and attach it to the small motif on the right of the focal section. See figure 13.
Step 15: Pass thread down until it comes out of the bottom left red bead on the bottom motif and string on 8(C). Pass the needle through five black beads on row four of the central motif and string on another 8(C). Pass back up into the bottom right red bead on the bottom small motif and add 12(C). Repeat to add the embellishment to the other side. See figure 14.
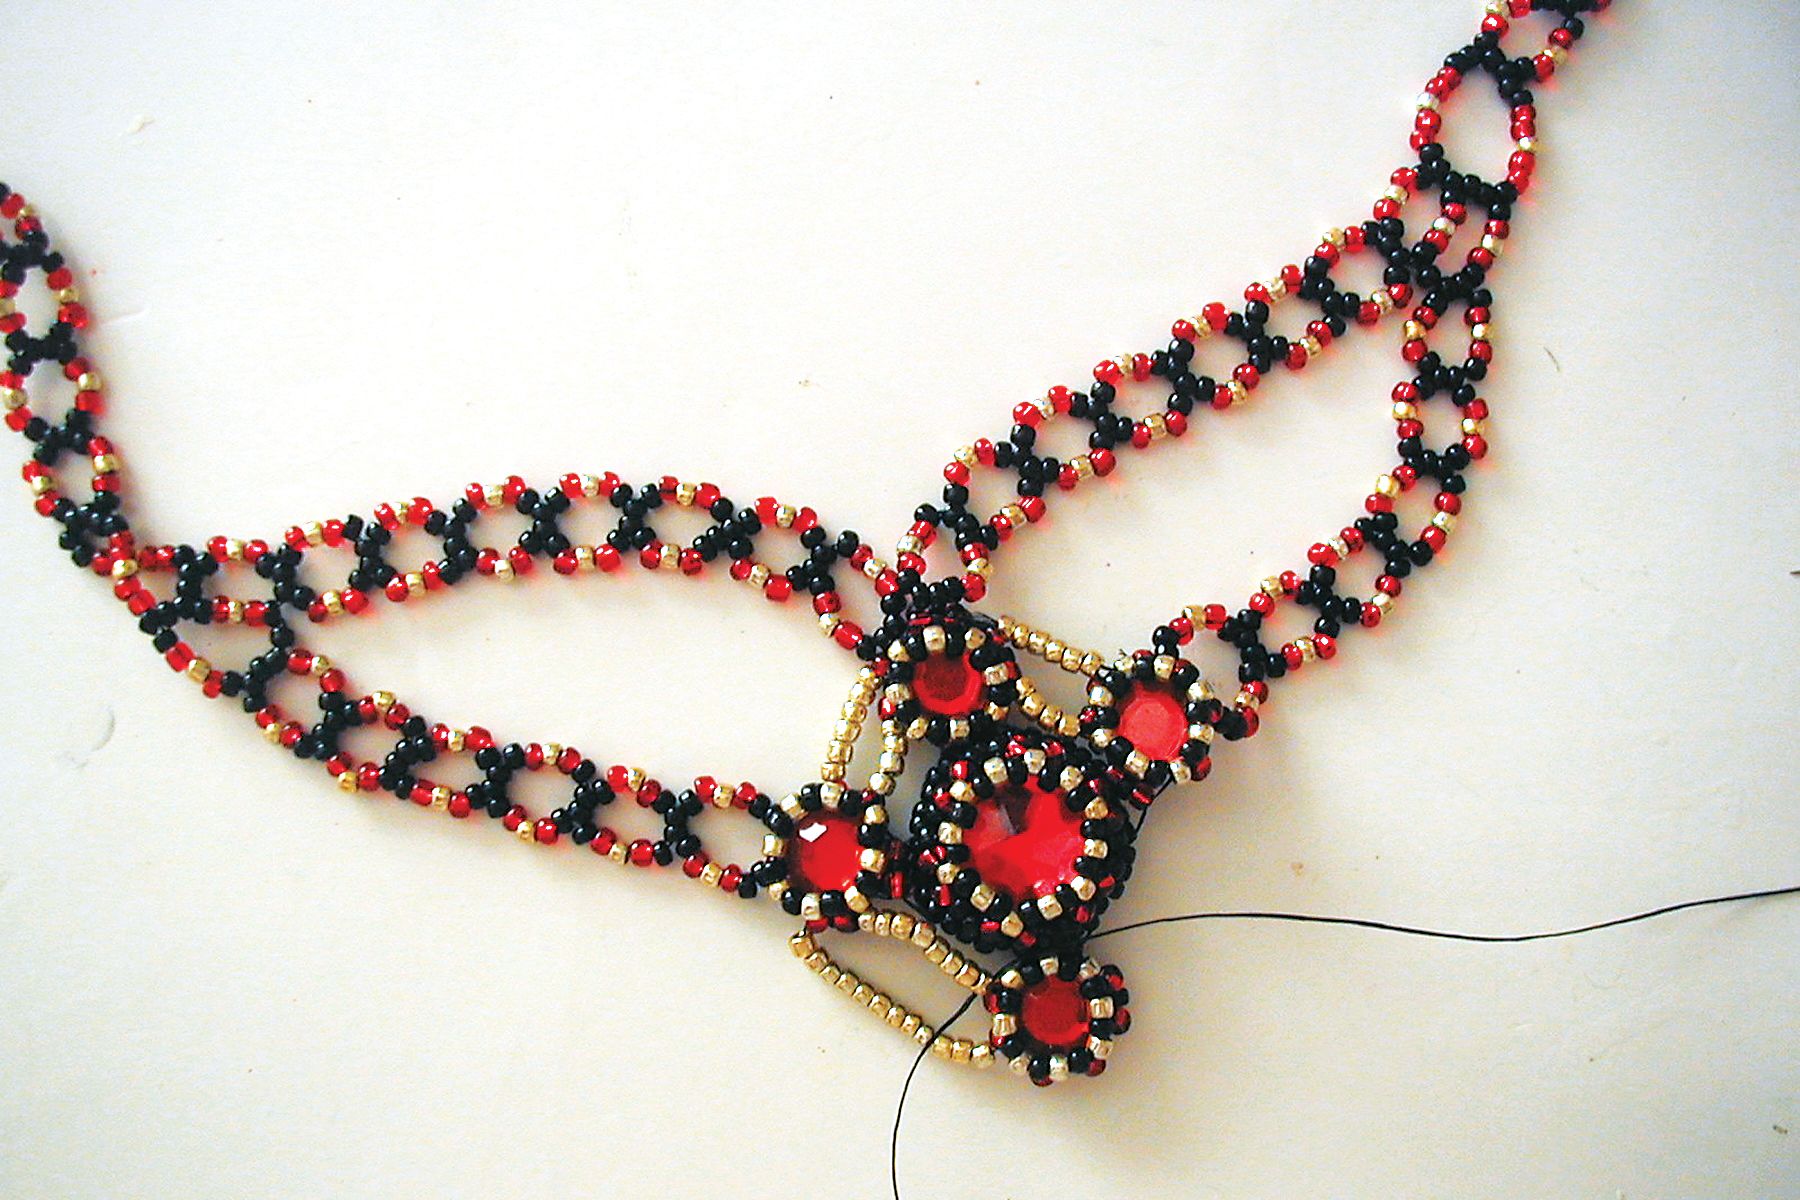
Step 16: To attach the bottom medium motif come out of the bottom black bead on the bottom motif (top row around the stone) and add 8(C). Pass the needle through five black beads on row 3 of the medium motif and add another 8(C). Pass the needle back up into the bottom of the small motif. You should pass through the black bead that is next but one (separated by a gold bead) to the bead from which you started this step. Finally, finish off your thread to complete the necklace.