Here we offer various different solutions for some of those tricky little problems when working with Peyote stitch.
Keeping Track of Rows
The row structure of Peyote stitch is something that can be notoriously difficult
to understand when you first start learning this stitch. Peyote stitch is structured in such a way that each row is made up from beads that stick up, with spaces between each one.
Whether you are starting a flat strip of Peyote, or making a tube, you will begin with a single length of beads, but these turn into two rows as you add the next set of beads (pick up a bead, skip a bead and pass through the one after). This confuses a lot of people for starters.
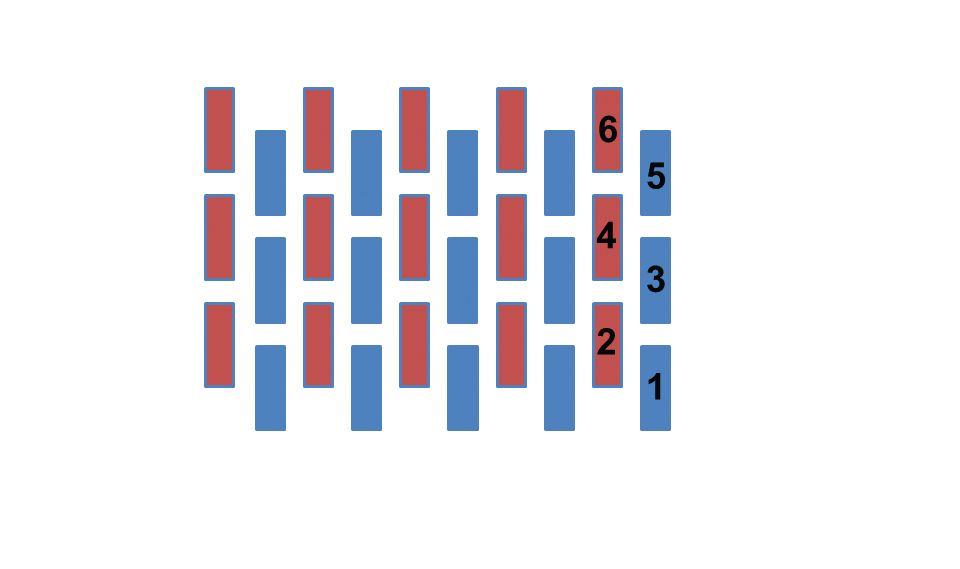
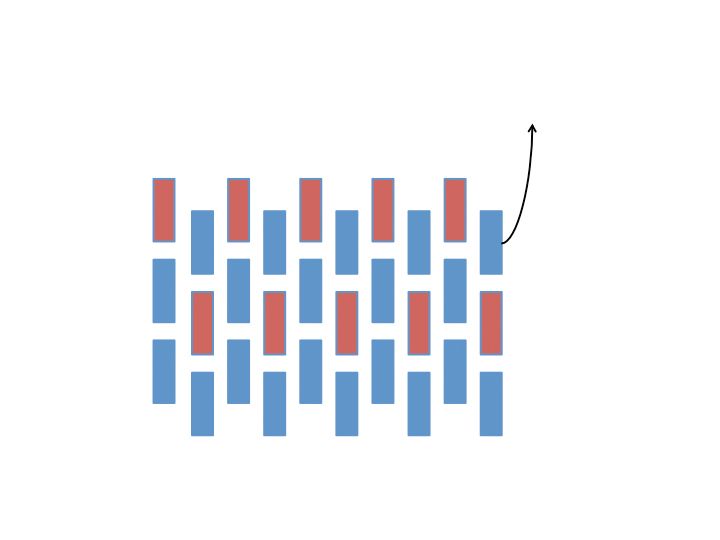
Once you have mastered that, you then need to understand how the rows are struc- tured when you come to count them. If you just count along one edge, counting the beads that are sitting on top of one another, you will find you are only counting every other row. So you need to count in a diagonal, not a straight vertical (or horizontal) line. Take a look at figure one, where the rows are numbered so you can see what we mean.
If you are instructed to ‘stitch 10 rows of Peyote’, then it is very helpful to understand how to count the rows so you can check your work. However, you might well be asking, how do you keep track of the rows as you are stitching them?
Well, the answer will depend a lot on you, but here are a few different methods for you to try. Firstly, you can try crossing the rows off on the pattern as you work, but if you are going to do this, then make sure you take a photocopy of your pattern, so you can scribble on that and keep the original fresh! Secondly, you can try making a list of the number of rows, then crossing out each number as you complete that row. Thirdly, if for example you are stitching 10 rows, then separate 10 beads out from your pile. For the first bead in each row, pick up one of those ten beads, so when the last bead has been used, you will know you have added your tenth row.
In a variation on this theme, you can place a bead in a little (empty) pot every time you stitch a row, so by counting the beads in your pot you will be able to see how many rows you have stitched.
Now, none of these methods is perfect: it is very easy to forget to cross out the row on your list, or to pick up a bead from the wrong pile, or forget to put a bead in your pot as you are engrossed in your beading. So, whichever method you try, don’t forget to count the rows to check that your method worked!
Joining Thread
The problem with joining new threads when you are new to Peyote stitch, is work- ing out where you finished the last thread so you know where to start the new thread. Here's have a couple of tips that will help to make life easier for you here.
If you're stitching a piece of flat even count Peyote, then finish your thread in the middle of the row, so you'll be able to see where the last ‘up’ bead is sitting and continue from that point. See figure 2.
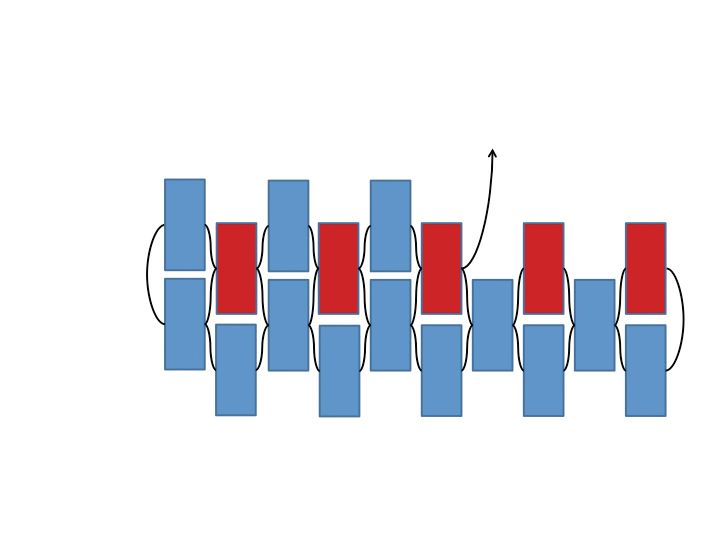
A common problem is if you try and finish at the end of the row, there is a chance that you will accidentally turn your beadwork over and then start the new thread from the opposite end. This works, apart from the fact that you will lose your turnaround! If you are trying to do this, then make sure you are starting the new thread from the side with the down bead on the end, so you will be exiting the down bead, away from the beadwork. Take a look at figure 3.
If you're working in flat odd count Peyote, then this is less of a problem: both ends of each row will be the same, so even if you do start from the opposite end to your finishing point, the turnaround will not be affected. If you're following a pattern, then take care that you don’t lose your place as you change thread!
If you're working in circular or tubular Peyote and you're not following a pattern, then always finish at the end of a row. This means you don’t have to worry about starting in the same place.
It can be a little trickier to spot the final ‘up’ bead in the middle of a row
of tubular, so changing thread at the end of the row solves this problem. However,
if your tubular Peyote has a pattern, then make sure you change thread in the middle of a row. In order for the pattern to work, you will need to start from exactly the same place that you stopped or the pattern won’t work.
If you change thread at the end of a row, you may quickly forget which bead you finished with, so it can be tricky to continue the pattern correctly. Whereas, changing thread in the middle of the row means you guarantee to start from exactly where you finished.
Following Patterns
The most common tip is to ‘read the beads’. Don’t get bogged down in trying to count along your row, as in ‘2 white beads, 2 black beads, 1 red bead, 2 black beads, 2 white beads.’ Instead, make sure you learn to read your actual beads and compare them to the pattern.
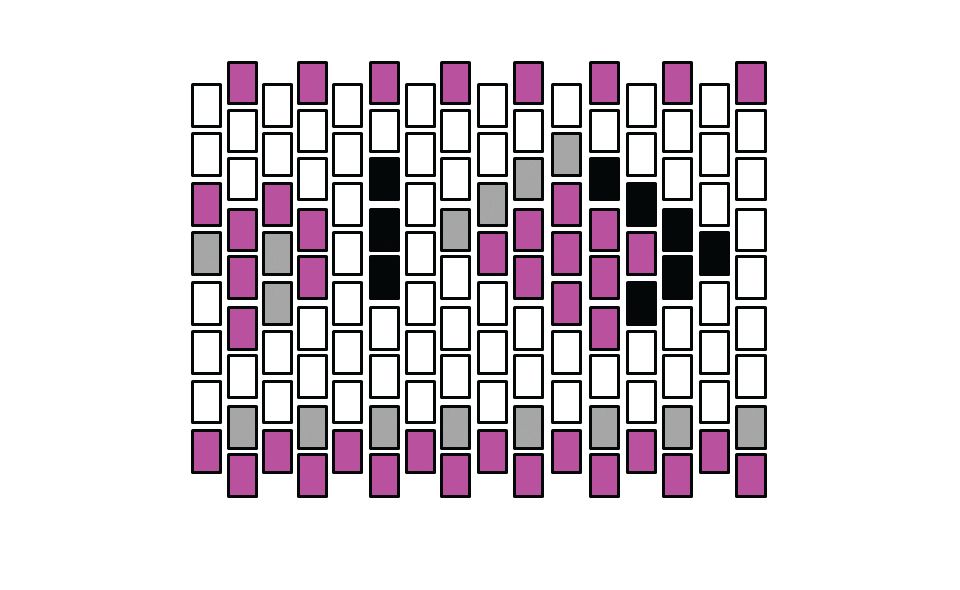
Take a look at figure 4: see the pink bead at the bottom of the diamond on the right. Once that is in place, when you come to stitch the next row, you can see immediately that you need to add a pink bead to its left and a black bead to its right, so there is no need to count along the row to find out which bead number these will be.
Another little tip, if you have the time: lay your beads out on your mat in order. It can be easier to read the pattern and take out your beads, then start beading with them instead of trying to add the beads whilst you simultaneously read the pattern. It may take a little longer to actually lay out your beads in between stitching each row, but if it saves some mistakes, then ultimately you will save the time you might otherwise have spent unpicking your work.
Hopefully these handy tips will help you to master Peyote stitch. It still remains one of the most popular beading techniques and is used in a lot of patterns. So it is well worth getting to know. If you want a little bit of practise, then try working up the pattern from figure 4 in your favourite colour beads. You can add a bail to one of the corners or sides and then hang it as a pendant.