
One of the questions I am most often asked is, ‘where do your ideas come from?’ Well, the answer is often, ‘I’m not sure – they just kind of pop into my head!’ That’s perhaps not the most helpful response from me if you’ve got ambitions to design and you need the confidence – and some tips – to help you get started. So, I’ve been thinking more about this in the hope of giving you some more useful advice.
Pinterest is perfect to help capture design ideas. It's also a perfect place to display finished beadwork, and to create boards of inspiration. But beware: by inspiration, I don’t mean copying.
There are strict laws in place about copying another artist’s work and then selling it as your own. So when I’m creating an inspiration board, I deliberately try not to fill it with samples of jewellery.
For me, it is just too tempting to be overly influenced by these images and end up inadvertently copying someone else. So, what does go on the board? Well, first we'll take a look at the handy design tool: the mood board.
Mood boards
You'll notice that designers often include mood boards in their books of beaded jewellery. I find this fascinating as it gives a great insight into the design process behind each project in the book. I also just happen to love looking at other people’s mood boards, but that’s another story!
So, what is a ‘mood board’? It is basically a collection of images that help to gather ideas to feed into a piece of jewellery. It might contain colour samples, samples of materials (this applies to an actual mood board, rather than an electronic version) and images that are connected to a theme.
Let’s imagine that you want to make a piece of jewellery for your best friend. How might you start creating a mood board? Well, start with colour: what are his/her favourite colours?
What colours of clothes does he/she wear a lot? Are these the same for daytime clothes as party clothes or work clothes? Are you planning to make a piece of jewellery that’s to be worn every day or just for special occasions?

As you answer these questions you will be gaining a series of samples of colours. Next, ask yourself, what kind of style does your friend have? Is he/she elegant or gothic, modern, simple, intricate, bold, delicate? Decide on a word or a few words that you feel describe his/her style and then try googling these words in google images.
Pick out images that appeal to you and that you think would appeal to your friend. These don’t need to be jewellery, but they will give you a few ideas about what your chosen ‘style word’ looks like in images. Finally, you might want to include some photos of your friend on the mood board.
Experiment
The more you look at your mood board, the more you will find ideas start to jump into your head about the kind of jewellery you are going to make. From this point, you can take out your beads to start experimenting, or sit down and make some sketches: whatever works best for you.
If you are using Pinterest, then you can find your images online and easily save them onto a Pinterest board. You can also keep your board private, so if you don’t want other people to see your design process they don’t need to. Eventually, you might like to share the board alongside your finished piece as well though!
For me, one of the great benefits of this is that I can create a board the second I have the inspiration, even though I might not have time to make the jewellery at that moment. The images will sit there until I am ready to start designing and beading and it means I won’t forget my ideas in the meantime!
Of course, if you’re not on Pinterest, you can use the same idea to create a sketch book: jot down ideas, words, or glue in images that fire your imagination. Then if you have the urge to design, but think you have no ideas, a look through your sketchbook or Pinterest board might just fire up your design mojo again.
Ideas and colours
The other area of design that has a lot of people stumped is choosing colours. Some people just seem to have a natural ability to take a colour and find partners for it without any effort. For others, the process of choosing bead colours is frankly, just scary.
If you are one of these people, then have you ever thought about using photos to put together colour schemes? Nature is a great source of inspiration. Mother Nature has an effortless gift for putting together colour combinations that we always find pleasing.
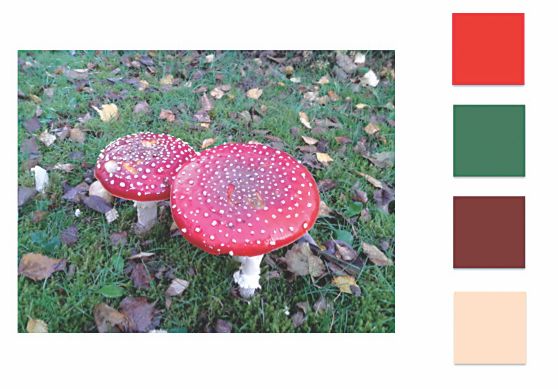
So, start by having a little search through your own photos, or search online images. Try not to focus on the subject of the image, just skim through and pick out something that appeals to you on the general level of colour. Save that image and if you have a drawing program, or even just Microsoft Word, start by pasting the image onto a sheet in the program.
Then set up a series of little squares next to the image – use as many squares as you need colours. Finally, use the colour selection tool in your software to choose a colour for each square – you will be able to match the colours to those you see in the image. The first square should be the colour that looks most dominant to you, then the second most prominent colour in the second square, and so on.
This little set of squares will give you a list of colours to look for in the beads. You can play around with which colour translates into which type of bead in your project. Remember to think about which is best to use as the highlight colour and which as a background. Hey presto – you have selected your colour scheme!
Hopefully these handy tips will help you to grow your design skills, whether you are creating your own project from scratch or trying to put your own colouring onto an existing project. Best of luck!